
Net Pot Seed Starting Guide for Hydroponics
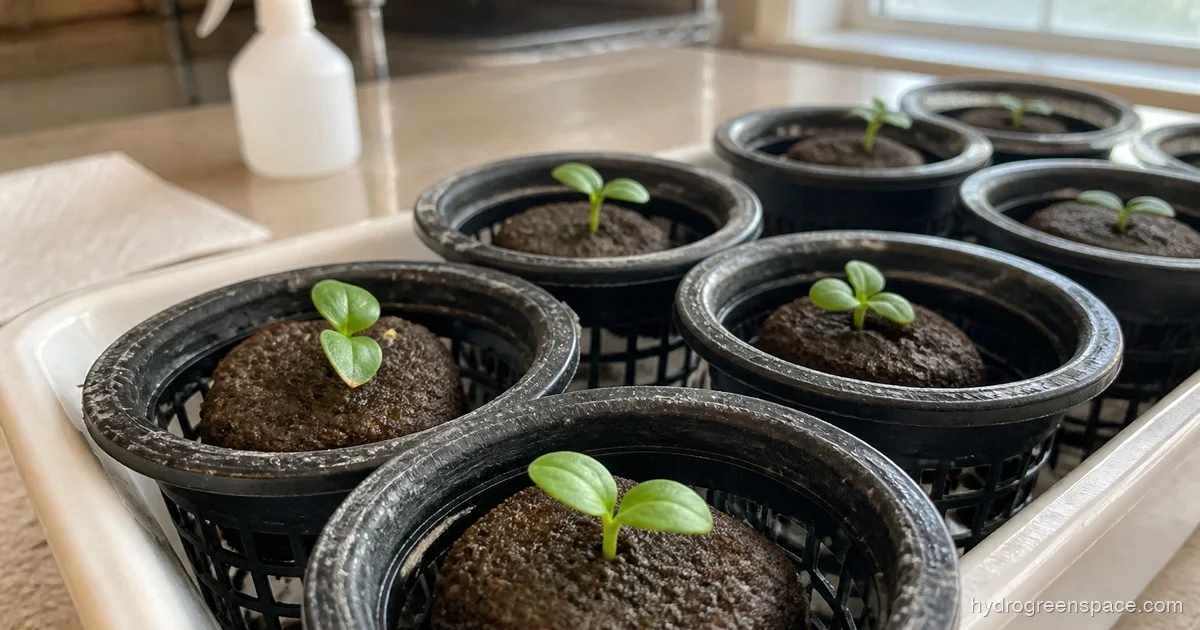
You’ve got net pots, you’ve got seeds, and you’re staring at them wondering if you can just drop a seed in there and get on with it. The short answer is: kind of. The real answer is that net pots weren’t designed to hold seeds on their own, but with the right plug and setup, they’re one of the cleanest ways to start seedlings for a hydroponic system. This guide walks you through every step, from choosing the right pot size to knowing exactly when your seedling is ready to move.
Net pots work for germination because they let roots air-prune naturally and drop straight into your system without needing to be disturbed. But the mesh design that makes them great for established plants creates a real problem during germination: moisture drains fast, seeds dry out, and bare seeds in loose media fall through the gaps. That’s why the plug is the critical piece.
Net Pot Size for Seeds: 2”, 3”, or Larger?
The size of your net pot matters more at germination than at any other stage. For most home hydroponic systems, 2-inch net pots are the standard starting point and they work well for herbs, lettuce, and other small-leafed greens. The confined space keeps a starter plug seated firmly, and the pot drops directly into most DWC lids and NFT channels without needing an adapter.
Go up to 3-inch pots if you’re starting larger plants (tomatoes, peppers, cucumbers) or if you’re using a peat pellet that expands to full size. A 3-inch pot gives roots more room before they hit the mesh, which buys you more time before you need to transplant or risk binding.
Anything larger than 3 inches is overkill for germination. Those sizes are built for established plants with developed root systems, not for a seed that’s just cracking open.
Tip: If you’re running a system with a fixed net pot size (like a 2-inch lid on your DWC bucket), buy plugs sized to fit that pot rather than the other way around. A plug that fits loosely will shift, drain fast, and dry out your seed before it sprouts.
What to Fill Net Pots With for Seeds
This is where most first-time hydroponic growers get stuck. The answer isn’t loose media, it’s a starter plug that holds moisture, supports the seed, and lets roots escape once they’re established.
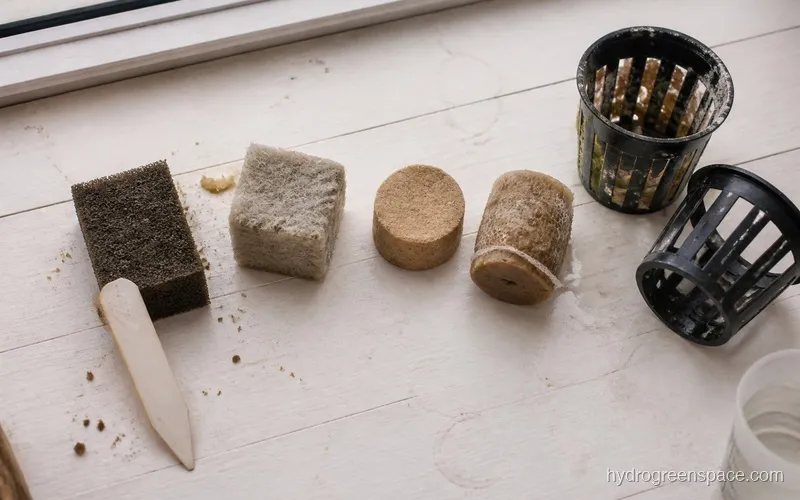
Here’s how the main plug types compare at the net pot level:
Rapid Rooter Plugs
Rapid Rooters are made from composted organic material with a polymer binder. They hold moisture exceptionally well, have a pre-formed seed hole, and roots move through them fast. Seat one in a 2-inch net pot and it fills the space cleanly. The main downside: they can get too wet if you’re not watching your water level.
If you want to go deeper on how these compare to traditional rockwool, Rapid Rooter vs rockwool breaks down the real differences for hydroponic propagation.
Rockwool Cubes
Rockwool is inert, pH-stable once soaked correctly, and roots don’t bind to it the way they do to organic media. A 1.5-inch cube fits inside a 2-inch net pot with room to pack hydroton around it. The critical step is pre-soaking at pH 5.5 for at least an hour before use. Skip that and the high natural pH of dry rockwool will stall germination.
Coco Coir Discs
Coco discs expand to fill the net pot when hydrated and provide a familiar, soil-like feel that beginners tend to trust. They hold moisture well but can compact over time, which slows root escape. Seed starting in coco coir covers this medium in detail if you want to go that route.
Peat Pellets
Peat pellets are the most forgiving option for complete beginners. Expand one with warm water, squeeze out the excess, drop it in your net pot. They hold just enough moisture and let you see the plug itself to gauge dryness. The mesh netting around a peat pellet can catch on the net pot mesh as roots develop, so cut it off before transplanting.
For a full breakdown of peat pellet germination, see seed starting in peat pellets.
Step-by-Step: Seating a Plug and Starting Seeds
1. Prepare your plug. Soak rockwool at pH 5.5 for 60 minutes. Hydrate peat pellets and coco discs with warm water, then squeeze gently until they stop dripping. Rapid Rooters should be moist out of the bag.
2. Seat the plug in the net pot. The plug should sit snugly with minimal gap around the sides. If there’s a gap, fill it with a small amount of hydroton (clay pebbles). Don’t pack them in tightly. You just want to prevent the plug from shifting.
3. Place your seed. Most plugs have a pre-formed hole. Place one or two seeds per plug, 1/4 inch deep. If germination is strong for your seed type, one seed is enough. If germination rate is unpredictable (older seeds, low-quality seed stock), plant two and thin to the strongest after sprouting.
4. Set up a humidity dome. A standard propagation tray with a clear dome is ideal. Arrange your net pots in the tray (without the net pots being submerged) and cover. The dome traps humidity and keeps the plug surface from drying out. No dome? Lay a piece of clear plastic wrap loosely over the top.
5. Add a small amount of water to the tray. Not so much that the net pots are sitting in water, just enough to create a humid environment and wick moisture up into the plug base. Keep the tray in a warm spot: 70-80°F is the target for most vegetable and herb seeds.
Water Level During Germination: The Detail That Trips People Up
During germination, your seeds are inside a plug that sits inside a net pot. There is no root system yet to drink from the reservoir; water uptake at this stage is purely capillary, wicking up through the plug material from the bottom.
The correct water level is: bottom of the net pot just kissing the water surface, or barely below it. You want the plug to stay moist from capillary action, not from being submerged. If the water rises more than halfway up the net pot, you’re overwatering the plug, reducing oxygen at the seed level, and setting up conditions for damping off.
Warning: In a DWC system, lower your water level before you add net pots with seeds. Fill to a level where the bottom of the net pot sits 1/2 inch above the waterline, then let the air stone’s splash and capillary action do the work. Once seedlings are established and roots are hanging freely, raise it.
If you’re using a propagation tray rather than a DWC lid, keep about 1/4 inch of water in the tray and refill every 1-2 days. Lift a plug and check the bottom; it should feel moist but not waterlogged.
Keeping Seeds Moist Without Drowning Them
The dome handles most of the moisture management during germination. Lift the dome once a day to allow some air exchange, check plug moisture by touch, and mist the plug surface lightly if the top feels dry. Closed domes build up humidity fast, and seedlings that stay in a saturated environment too long are vulnerable to damping off.
Once your seeds have sprouted and you see the cotyledons fully open, remove the dome. At that point, the seedling needs air circulation and light more than it needs high humidity. Keep the tray water topped up and add a weak nutrient solution (EC around 0.4-0.6) once the first true leaves appear.
When Is Your Seedling Ready to Move?
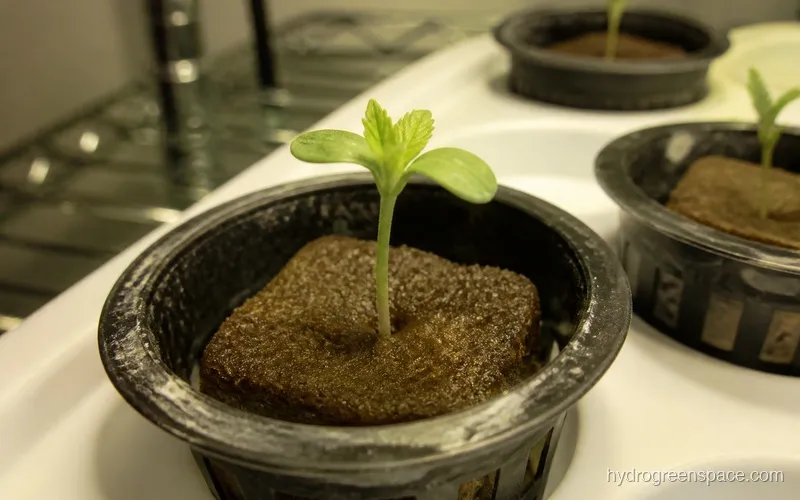
“Ready to transplant” is not just about height. You’re looking for two things: true leaves and visible root emergence.
True leaves are the second pair of leaves that appear after the cotyledons (seed leaves). They look like miniature versions of the plant’s mature foliage. Cotyledons are round and generic; true leaves are the real thing. Wait for at least one set of true leaves before moving a seedling to your main system.
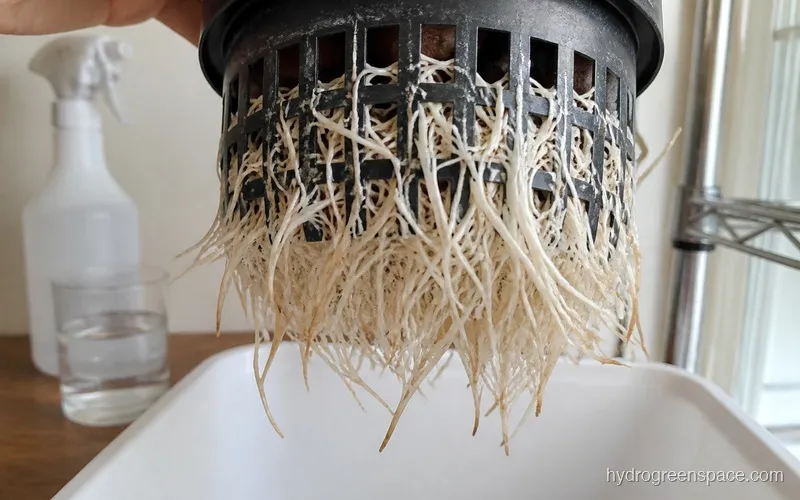
More importantly, check the bottom of the net pot. Roots should be visible poking out through the mesh. This tells you the root system is established enough to access nutrient solution directly once the net pot is placed in the system. For a deeper look at the full transplant process, transplanting seedlings to hydroponics covers what to watch for and how to minimize stress during the move.
What I’d do: Wait until roots are just starting to emerge from the bottom, not 2 inches of hanging roots, just the first tips showing. Move sooner rather than later.
Preventing Roots from Binding to the Mesh
This is a real problem, and it gets worse the longer you wait. Net pot mesh is designed to let roots pass through, but in practice, roots weave into the plastic and hold on. By the time you realize it, pulling the plug damages the root system.
The fix is timing. Move your seedling to the main system as soon as you see that first root tip at the bottom of the net pot. Don’t wait for a “fuller” root system in the plug.
If you’re using a non-standard plug (like loose coco or perlite instead of a formed plug), roots find the mesh even faster because there’s no plug body slowing their outward growth. Stick with formed plugs during germination and you’ll have far fewer binding issues.
Getting Seeds Started Without Rockwool
If you’d rather avoid rockwool entirely, there are solid alternatives that work well in net pots. The key is always using a formed plug rather than loose media. Germinating seeds for hydroponics without rockwool covers the best options side by side if you want to compare before committing to a method.
Once your seedling is in the main system with roots hanging free and true leaves growing, the hard part is over. The net pot becomes exactly what it was designed to be: a stable anchor that lets your plant drink freely. Getting there just takes the right plug, the right water level, and a little patience with the dome. For a complete overview of every germination method and what happens from seed to transplant, the seed starting for hydroponics guide covers the full process.