
Seed Starting in Peat Pellets for Hydroponics
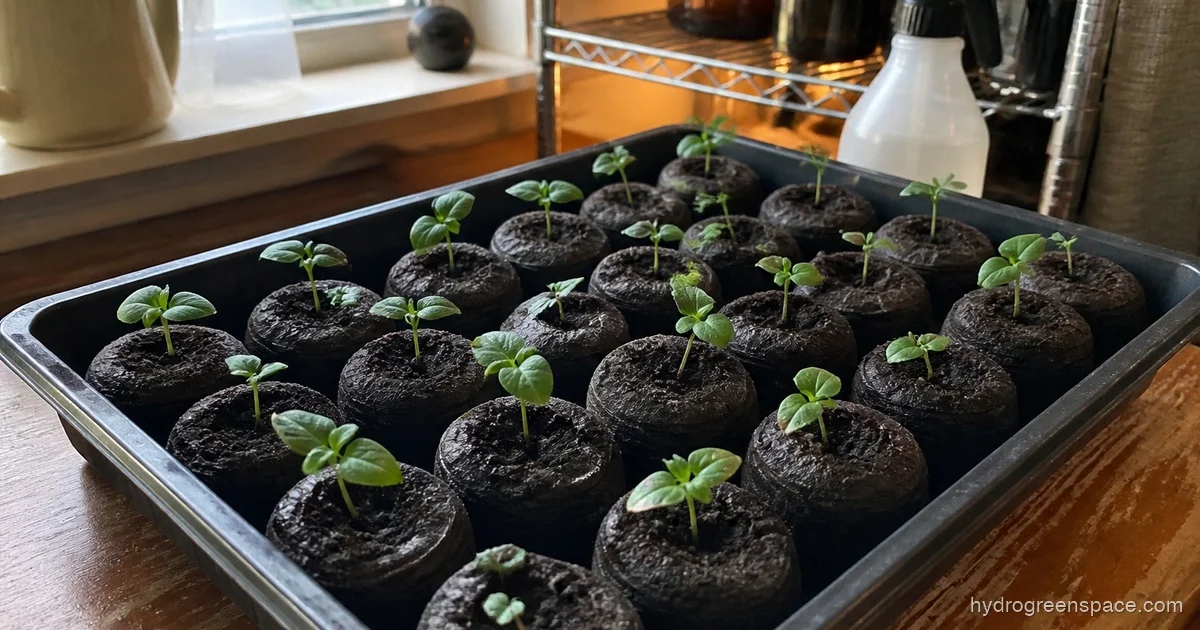
Peat pellets are one of the easiest ways to start seeds for hydroponics, but the pellet itself can work against you once you move it into a system. The netting, the pH, the timing: get any of these wrong and you’ll wonder why your seedlings are stalling out right when they should be taking off. Here’s how to do it right from the first drop of water to the moment your roots hit nutrient solution.
How to Expand Peat Pellets Before You Plant
Dry peat pellets look like small brown coins. You can’t plant into them that way. The compressed peat needs water to open up into a workable growing medium.
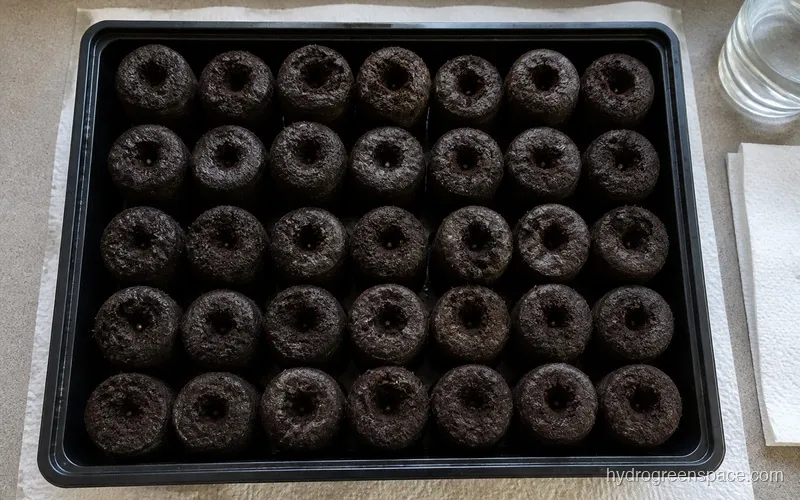
Set your pellets in a tray and pour warm water over them. Room temperature works, but warm water (~70–80°F) speeds up expansion. Most standard Jiffy pellets expand fully in about 5 minutes, going from roughly 1cm thick to 4–5cm tall. You’ll know they’re ready when the expansion stops and the top surface feels spongy rather than firm.
Once expanded, squeeze each pellet gently to press out excess water. You want the peat moist but not waterlogged. If water streams out when you squeeze, it’s too wet. Soggy peat invites damping off before your seed even germinates.
Tip: Use plain, pH-balanced water for expansion, not your nutrient solution. Peat moss is naturally acidic (around pH 3.5–4.5 before buffering), and adding fertilizer at this stage doesn’t help germination. Plain water is all the pellet needs until roots are established.
Planting Seeds in Peat Pellets
Each expanded pellet has a small depression at the top. That’s your planting hole. For most vegetable and herb seeds, the hole needs to be about 1/4 inch deep. The problem is that many pellets come with a hole that’s too shallow, and growers just drop the seed in without adjusting it.
A shallow hole leads to one of the most frustrating germination problems: helmet head. The seedling pushes up with the seed coat still stuck on the cotyledons, can’t open, and either dies or grows malformed. To prevent this, deepen the hole with a toothpick or the tip of a pencil before planting.
Seeds per pellet: One seed per pellet if you’re growing in a hydroponic system. In soil you can thin later, but in hydroponics each pellet goes into one net pot, and overcrowding means two plants competing for one position. The exception is very small seeds like basil, where you can plant 2–3 and thin to the strongest once they sprout.
After placing the seed, pinch the peat lightly over the hole to cover it. Don’t pack it down hard. Seeds need air to germinate. A light cover is enough.
Dome Care: The Window Between Germination and Stalling
A humidity dome is your best friend during germination, but it becomes a liability if you leave it on too long. The setup is simple: put your planted pellets on a propagation tray, add the clear dome, and keep them somewhere warm (70–80°F is the sweet spot for most vegetables and herbs).
Keep the dome on until you see the first leaves pushing up. At that point, crack it open slightly to start introducing lower humidity. Lift it for 15 minutes twice a day for a couple of days, then remove it entirely. Seedlings that go straight from 90% humidity inside the dome to open air often get stressed and slow down.
The two things to watch for under the dome:
Drying out. Peat pellets dry out faster than most people expect, especially if your propagation space has any airflow or heat. Check the pellets daily. They should feel moist to the touch. If the surface looks lighter in color (dry peat pales), mist them lightly. Don’t pour water on them, or you’ll waterlog the roots. A spray bottle is the right tool here.
Damping off. This is a fungal problem that can kill seedlings at the soil line, and peat under a dome is the ideal environment for it if the medium is too wet. If you see seedlings suddenly flopping over at the base, that’s damping off. Good airflow and avoiding overwatering are the main defenses. Check out preventing damping off in hydroponic seedlings for the full breakdown.
How Long Can Seedlings Stay in Peat Pellets?
This is one of the most common questions, and the answer depends more on root development than a calendar date.
A seedling is ready to move when its roots are visibly coming through the netting on the sides and bottom of the pellet. For fast-growing crops like lettuce, that’s typically 7–14 days after germination. Slower crops like tomatoes and peppers can take 2–3 weeks.
Don’t rush the transfer. A seedling moved too early is more vulnerable to transplant shock. But don’t wait too long either. Once roots are coming through the netting, they need more water and nutrients than the pellet can hold, and you’ll see rapid decline if you leave them in the tray too long.
The Netting Question: Do You Remove It for Hydroponics?
Peat pellets are held together by a fine biodegradable mesh netting. For soil transplanting, you can plant the whole pellet and the netting breaks down in the ground over time. For hydroponics, it’s more complicated.
The problem: In a DWC system or any reservoir-based setup, the netting doesn’t break down quickly in water. As roots grow through it, they can bind around the mesh and get restricted. More urgently, if any netting material starts to fray and detach, it can get pulled into your recirculating system and clog a pump.
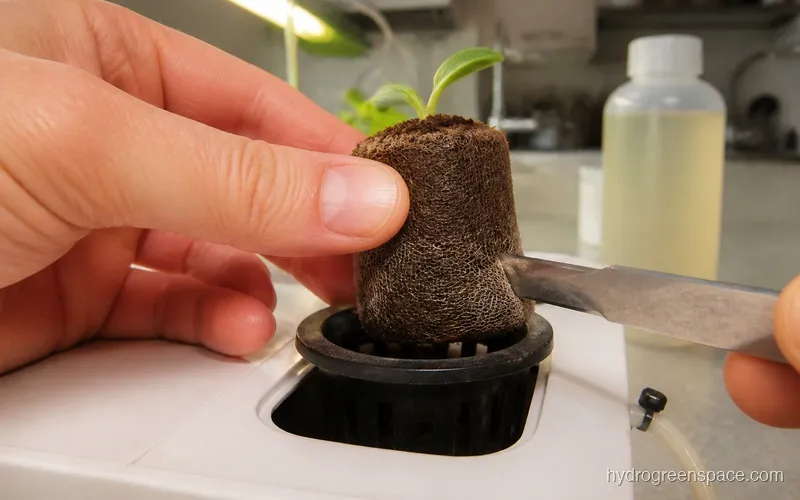
What to do: Before placing the pellet in a net pot, score the netting with a razor blade or scissors. Make 3–4 vertical slits down the sides and cut away the bottom section if roots are already emerging. You don’t need to remove the netting entirely. Just break it open enough that roots can escape freely and there’s no closed mesh cage around the root ball.
If you’re putting the pellet directly into a net pot filled with clay pebbles, this is especially important. Roots that can’t escape the netting will spiral inside the pellet and eventually choke themselves.
pH Drift After Transplant
Peat moss is naturally very acidic, sitting around pH 3.5–4.5 before any treatment. Jiffy pellets are buffered before sale, which brings the pH up somewhat, but they still tend to run acidic, typically around pH 5.5–6.0 after expansion with plain water.
That’s actually close to the hydroponic sweet spot (5.5–6.5 for most crops), so the issue isn’t that the pellet will wreck your system immediately. The issue is the first 24–48 hours after transplant. A freshly transferred peat pellet will slowly release slightly acidic water into your reservoir, which can nudge your nutrient solution pH lower than you want.
After transplanting into your system, check your reservoir pH the day after and again 48 hours in. If it’s drifting down, do a small pH-up correction. This is a temporary effect. Once the pellet has been in the system a few days and roots are established, it stabilizes.
If you want to be more proactive, soak expanded pellets in pH-adjusted water (pH 5.8–6.0) for 30 minutes before planting. This prebuffers the peat and reduces the post-transplant pH swing in your reservoir.
Transferring Peat Pellet Seedlings to a Hydroponic System
Here’s the step-by-step process:
- Check roots. The pellet should have white roots visibly coming through the sides. If roots look brown or slimy, check for rot before moving forward.
- Score the netting. As described above: 3–4 vertical slits plus the bottom opened up.
- Prep the net pot. Add a layer of rinsed clay pebbles (hydroton) at the bottom of the net pot, then nestle the peat pellet in the center.
- Fill around the pellet with more clay pebbles until the pellet is supported but not buried. The top of the pellet should sit just below the rim of the net pot.
- Set your water level. In DWC, the water should be close enough to wick into the bottom of the net pot for the first few days. Once roots reach the reservoir, you can drop the water level to the standard operating height.
- Check pH the next day. See above. Peat can nudge pH slightly acidic in the first day or two.
For more detail on the net pot setup itself, getting seeds started in net pots covers the pellet-to-net-pot transition in full.
Peat Pellets vs. Other Hydroponic Starter Media
Peat pellets are convenient, widely available, and beginner-friendly. But they’re not the only option. Rapid Rooters and rockwool both handle the hydroponic handoff differently. Rapid Rooters are pre-inoculated with beneficial microbes and are pH-neutral, while rockwool is inert and pH-adjustable. If you find peat’s acidity a hassle to manage, Rapid Rooters are worth a look.
If you want to avoid pellets entirely, seed starting in coco coir is a solid alternative. Coco drains well, buffers pH more neutrally than peat, and roots transition easily into hydroponics.
For anyone not sure whether pellets even fit your germination method, germinating seeds for hydroponics without rockwool covers the full range of no-rockwool options, including peat, coco, and Rapid Rooters.
Once your seedlings are rooted and living in your system, the next step is transplanting seedlings into hydroponics: getting them established, dialing in your nutrient solution, and watching them take off.
Peat pellets are a practical, low-cost bridge between a seed and a hydroponic system. The growers who run into trouble are almost always the ones skipping the netting prep or ignoring pH after transplant. Handle those two things, time your transfer right, and there’s no reason a peat-started seedling should miss a beat when it hits your reservoir. For a complete look at all your seed-starting options and what to expect at each stage, the seed starting for hydroponics guide covers every germination method side by side.