
Best Propagation Trays for Hydroponics: 2025 Guide
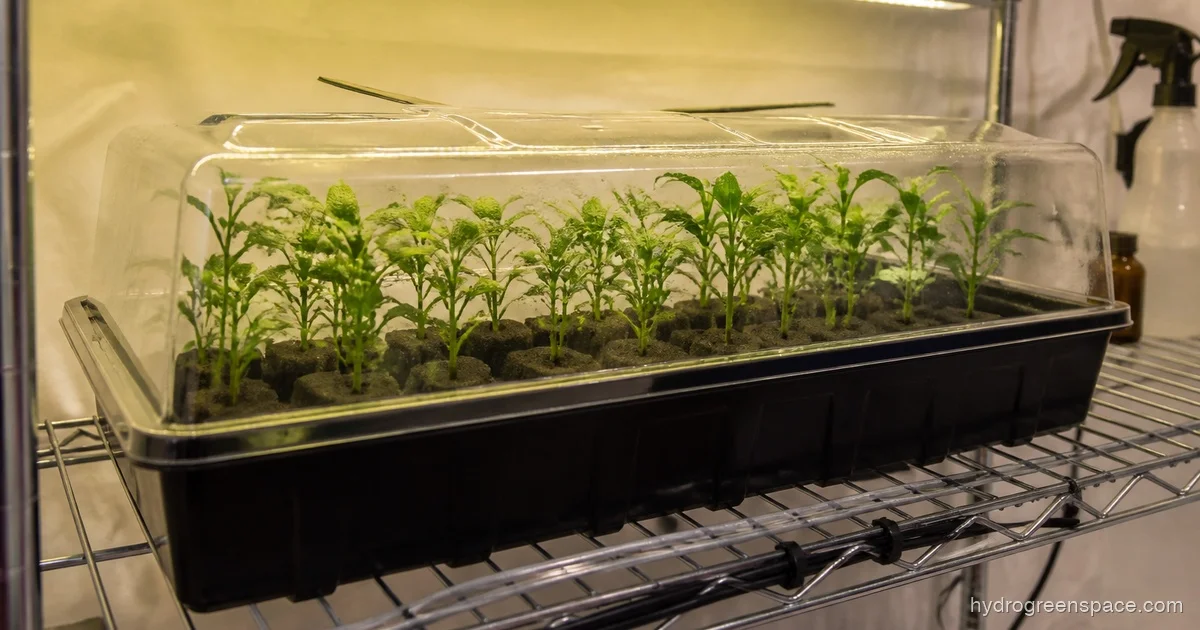
Most growers pick a propagation tray by size and move on. Then they wonder why their rockwool cubes keep tipping, their dome fogs up unevenly, or their seedlings stretch before they even hit the system. Choosing the wrong tray for your media can cost you an entire germination round.
This guide covers the best propagation trays for hydroponics based on what you’re actually propagating with: rockwool cubes, rapid rooter plugs, coco coir plugs, or peat pellets. For each tray, I’ll also tell you when it’s time to move those seedlings from the tray into your net pots before they stall out.
What Actually Makes a Propagation Tray Good for Hydroponics
Not all propagation trays are built for hydroponic use. Standard nursery trays are designed for soil plugs that need drainage. In hydroponics, you’re often running a humidity dome, a heat mat underneath, and media that holds moisture on its own. That changes what you need in a tray.
A few things that matter most:
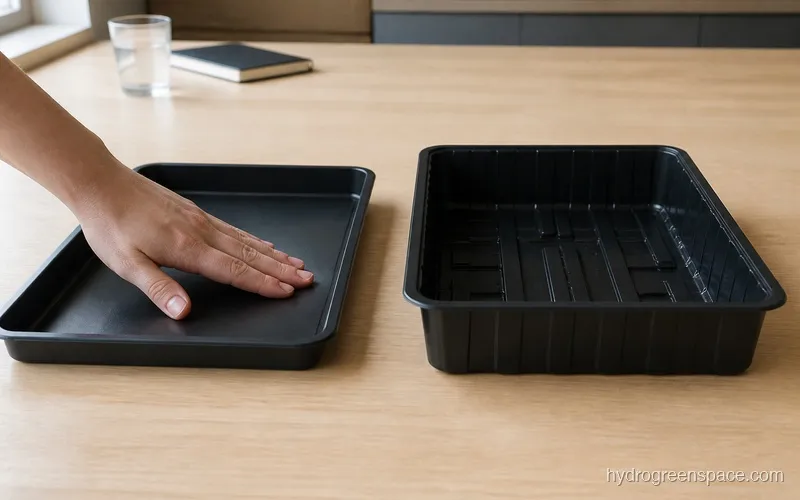
Structural rigidity. A flimsy tray buckles when you fill it with saturated rockwool or 50 rapid rooter plugs. Heavy-duty 1020 trays (look for 40-mil or thicker) don’t flex. This is especially important when lifting a full tray off a heat mat without losing plugs.
Drainage hole options. For hydroponic propagation, you often want a tray with no drainage holes so you can flood the bottom slightly, keeping media moist from below. But if you’re hand-watering from the top, some drainage prevents waterlogging. Many growers buy both versions and nest them.
Dome compatibility. The standard 1020 tray size (10x20 inches) means any 1020-compatible dome fits. Taller domes (6-inch or 7-inch) give you room for taller cuttings and better airflow venting. Short domes work fine for seeds but will crush tomato seedlings by day 10.
Heat mat fit. Most standard heat mats are sized for 1020 trays. If you’re using a non-standard tray, check dimensions before assuming they pair up. A mat that runs too hot under a thin plastic tray can also warp it over multiple cycles.
The Best Propagation Trays for Hydroponics
Bootstrap Farmer 1020 Propagation Trays (Heavy-Duty, No Holes)
Bootstrap Farmer’s heavy-duty trays are the benchmark everything else gets compared to. They’re made from 33-mil HPDE, reusable for multiple seasons, and available in both with-holes and without-holes versions. The no-hole version is what you want for flood-and-drain style propagation, where you pour a half-inch of water in the bottom and let the media wick up.
These trays fit standard 1020 humidity domes without any fuss, and they pair well with heat mats. I’ve run 40-mil Bootstrap Farmer trays through over a dozen cycles of rockwool propagation and they’ve held their shape throughout.
Media compatibility: Excellent for rockwool cubes (1.5-inch or 2-inch), rapid rooter plugs, and coco coir plugs. The flat bottom keeps everything upright without inserts.
Bootstrap Farmer 1020 Propagation Trays (10-Pack, No Holes)
Best for: Rockwool cubes and rapid rooter plugs, flood-style propagation
Check price on AmazonWhat I’d do: Buy one pack of no-hole trays and one pack of with-hole trays. Nest the with-hole tray inside the no-hole tray when you want bottom-up moisture, and pull it out when you want drainage. This two-tray setup is what most commercial propagation rooms use.
Bootstrap Farmer 1020 Tray With Holes (Heavy-Duty)
The same durable construction as the no-hole version, but with drainage slots. Use this one when you’re hand-watering from above and don’t want standing water under your media. If you’re using a self-watering insert or a propagation mat, this version also works well as the inner tray in a nest setup.
Media compatibility: Better for peat pellets, which swell and need to shed excess moisture faster than rockwool. Also fine for coco plugs if you’re watering manually.
Bootstrap Farmer 1020 Propagation Trays (10-Pack, With Holes)
Best for: Hand-watered propagation, peat pellets, inner tray in a nested setup
Check price on AmazonBootstrap Farmer 1020 Humidity Dome (6-Inch)
Bootstrap Farmer’s 6-inch dome fits their 1020 trays (and most standard 1020s), has adjustable vents along the top, and is thick enough to not crack when you pull it off. The 6-inch height is the sweet spot: tall enough for tomato and pepper seedlings to stretch without hitting the roof, not so tall that humidity stratifies at the top instead of surrounding your media.
When to vent: Once you see cotyledons, crack the vents halfway. Full dome off once true leaves appear, usually days 7-14. Leaving the dome sealed too long after germination invites damping off, a fungal issue that kills seedlings at the soil line fast. preventing damping off
Bootstrap Farmer 1020 Humidity Dome, 6-Inch
Best for: Standard 1020 trays, tomatoes/peppers/herbs, multi-cycle reuse
Check price on Amazon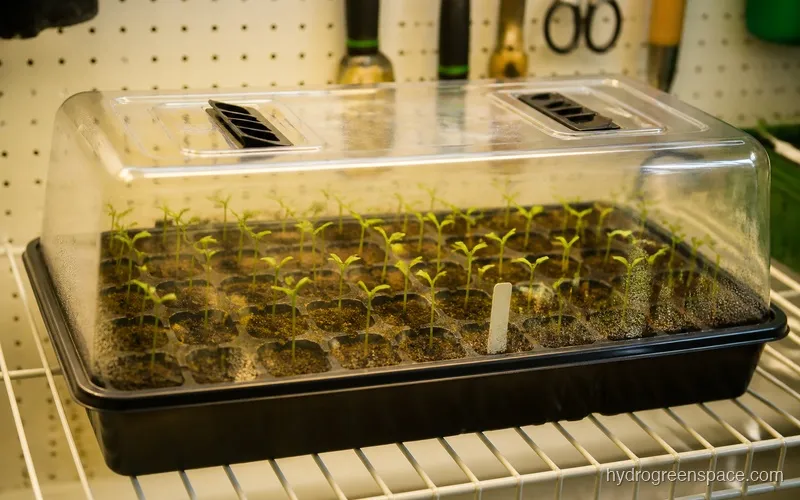
CLONE KING 36 Site Aeroponic Cloner
If you’re not germinating seeds but cloning from cuttings, the Clone King is a different category entirely. It’s a self-contained aeroponic cloner that mists roots every few minutes. You skip the tray-and-dome setup completely. Cuttings root in 7-14 days in water temps around 72-74 degrees F.
This is relevant here because a lot of hydroponic growers use propagation trays for seeds and a dedicated cloner for vegetative cuttings. Knowing which tool does which job saves you from trying to root tomato cuttings in rockwool when you could be doing it faster in an aeroponic cloner.
Not for seeds. The Clone King is for cuttings only. Seeds need a tray, humidity dome, and best heat mats for seedlings heat mat.
Clone King 36 Site Aeroponic Cloner
Best for: Vegetative cuttings, fast rooting without rockwool or plugs
Check price on AmazonViagrow Heavy-Duty Propagation Tray (10-Pack)
Viagrow’s trays are a common budget pick and they’re not bad for what they are. The plastic is thinner than Bootstrap Farmer, and they tend to warp slightly after heat mat exposure over multiple cycles. For one-time use or for growers who replace trays every season, they work fine. For someone running a high-volume cloning operation or propagating 50+ seedlings every two weeks, the Bootstrap Farmer trays will save you money long-term despite the higher upfront cost.
Media compatibility: Fine for single-use peat pellet propagation. Less ideal for repeat flood cycles with rockwool because the tray base can develop subtle warps that cause uneven water distribution.
Viagrow Heavy-Duty 1020 Propagation Trays (10-Pack)
Best for: Occasional use, peat pellets, budget first setup
Check price on AmazonAC Infinity Humidity Dome Germination Kit
AC Infinity entered the propagation space with a dome that has a cleaner vent design than most: two separate sliding panels instead of a single hinged flap. This gives you finer humidity control, which matters when you’re dealing with media like peat pellets that tend to hold more moisture than rapid rooters and need more airflow to avoid damping off.
One thing to know: this is a full germination kit that comes with AC Infinity’s own 6x12-inch tray, not a drop-in dome for a standard 1020 tray. If you’re already running Bootstrap Farmer 1020 trays, stick with the Bootstrap Farmer dome above. The AC Infinity kit makes more sense if you’re starting fresh and want everything matched, or if you’re already buying AC Infinity fans or light controllers and want a cohesive brand stack.
AC Infinity Humidity Dome Germination Kit
Best for: Fresh setups, peat pellets, fine humidity control, AC Infinity brand stacks
Check price on AmazonComes with its own 6x12 tray — not a drop-in for standard 1020 trays
Which Media Works in Which Tray
The tray affects how well your media performs, and different media have different requirements.
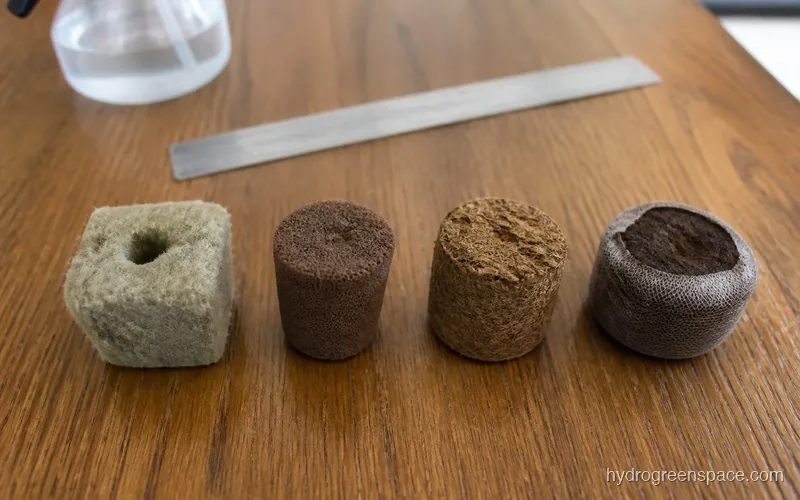
Rockwool cubes: Use a no-hole tray so you can flood it to a consistent level. Rockwool holds water well but needs to sit in a thin film of water during germination, not stay dry between waterings. Pre-soak your cubes in pH 5.5 water before placing seeds. The Bootstrap Farmer no-hole tray with a 6-inch dome is the standard setup. For a full walkthrough, see how to use rockwool in a propagation tray.
Rapid rooter plugs: Similar to rockwool in that they benefit from a no-hole tray and bottom-up moisture. Rapid rooters come pre-moistened and don’t need pre-soaking. They produce roots faster than rockwool for many growers and are more forgiving of pH swings. If you’re comparing the two, the guide on rockwool cubes vs. rapid rooters covers the tradeoffs in detail.
Coco coir plugs: These drain more freely than rockwool and tend to dry out faster. A with-hole tray or a nested setup works better here. If you’re interested in coco as a propagation medium, starting seeds in coco coir goes into detail on prep and watering schedules.
Peat pellets: Peat pellets swell 3-5x when wet and need a tray with drainage holes or they sit in standing water and rot. Use the with-hole tray for peat, and vent the dome earlier than you would with rockwool.
When to Transplant from Tray into Net Pots
Timing the move from propagation tray to net pot is one of the most common beginner mistakes. Move too early and the seedling hasn’t developed enough root mass to anchor in the net pot. Move too late and roots start circling the bottom of the tray or growing into each other.
The rule I use: roots visible outside the plug, cotyledons fully open, first true leaves just starting. That’s the transplant window. For most leafy greens and herbs, that’s days 10-18 at 72-78 degrees F. For tomatoes and peppers, expect days 14-21.
Net pot size matters here too. A 2-inch rapid rooter or rockwool cube fits directly into a 2-inch net pot. A 1.5-inch cube fits loosely in a 2-inch net pot but works fine with a little extra clay pebbles to hold it in place. The fit doesn’t need to be perfect, but it shouldn’t be so loose that the plug sinks sideways into the reservoir.
For a full walkthrough on moving seedlings from propagation tray to your system, transplanting seedlings to your system covers DWC, NFT, and ebb-and-flow setups specifically.
Quick Answers to the Most Common Questions
What size propagation tray do I need? Standard 1020 (10x20 inches) covers almost every home grow setup. It fits standard 72-cell inserts, 50-site rapid rooter trays, and 2-inch rockwool blocks. Only go smaller if you’re working in a very limited space.
Do I need a humidity dome with a propagation tray? Yes, for seeds. The dome holds humidity above 80%, which dramatically improves germination rates. Cuttings in an aeroponic cloner don’t need a dome. Once seedlings emerge and show true leaves, the dome comes off.
Can I reuse propagation trays? Heavy-duty trays like Bootstrap Farmer are designed for multi-cycle reuse. Wash with a 1:10 bleach solution between cycles to prevent pathogen carryover. Thin single-use trays degrade quickly and aren’t worth reusing more than once or twice.
What goes inside a propagation tray for hydroponics? Most hydroponic growers use rockwool cubes, rapid rooter plugs, or coco coir plugs placed directly in the tray. Some use 72-cell insert trays with peat pellets inside the larger 1020 tray. You don’t use soil. For a full breakdown of media options, growing media for hydroponics covers every common choice.
Do propagation trays need drainage holes? It depends on your media and watering method. No-hole trays work best for rockwool and rapid rooters in a flood setup. With-hole trays work better for peat pellets or hand-watered coco plugs. Many growers own both and use a nested setup.
What temperature do seeds need to germinate? Most vegetable and herb seeds germinate best at 72-78 degrees F. Tomatoes and peppers prefer the high end of that range (76-80 degrees F) and benefit significantly from a heat mat. Lettuce germinates at lower temps (65-70 degrees F) and can actually be inhibited by temperatures above 80 degrees F. Seed-specific temperature tables are available on most seed packets and are worth reading before setting up your heat mat.
Once you’ve picked your tray and dome setup, the next variables are your media choice and your heat mat. Most growers underestimate how much germination speed and uniformity improve with consistent bottom heat. If you haven’t dialed in that part of your propagation setup yet, checking out the best seeds for hydroponics guide will also help you match seed selection to your system before you even fill the first tray. For a complete overview of every seed-starting decision from germination through transplant, the seed starting for hydroponics guide ties it all together.