
Downspout Hydroponics: Build NFT or Kratky Channels
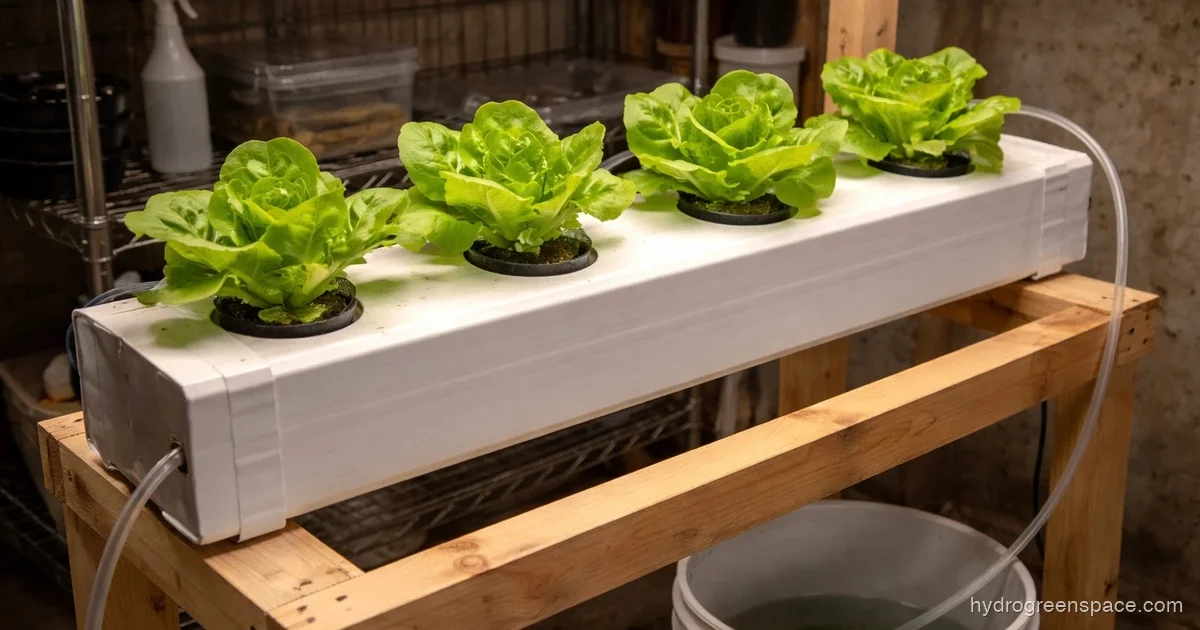
Vinyl downspouts are cheap, enclosed, and available in sizes that fit standard net cups perfectly. That combination makes them one of the most underrated hydroponic channel options you can buy at a hardware store for under $10 a piece. If you’ve already looked at gutter hydroponics and wanted something a little more enclosed to reduce algae and evaporation, downspouts are the natural next step.
This guide covers how to build a working downspout hydroponic system from scratch (NFT recirculating, static Kratky, and a simple stacked rack version), plus the honest tradeoffs you’ll hit along the way.
What a Downspout Hydroponic System Actually Is
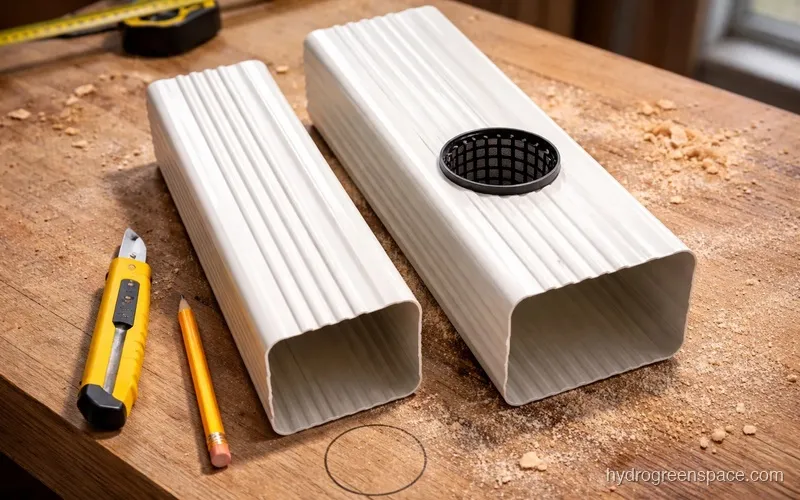
A downspout system uses rectangular vinyl downspout sections as growing channels. You cut holes in the top face at regular intervals to hold net cups, and plants grow down into the channel where nutrient solution either flows through (NFT) or sits static (Kratky). The enclosed rectangular profile is the key advantage: it blocks light to the root zone, keeps evaporation low, and gives you a clean stackable shape that round gutter sections can’t match.
Downspout vs. Gutter: The Real Difference
The question I see come up constantly is whether to use a rain gutter or a downspout. They’re both cheap vinyl sections from the same aisle. Here’s how to think about it:
Gutters are open-topped U-channels. They’re easy to drill, give you great visibility into the root zone, and the open top makes it simple to check on plants. The tradeoff is light exposure. Algae will grow in an open gutter system if any light hits the solution, which it usually does in a garage or outdoor setup.
Downspouts are fully enclosed rectangular tubes. You cut holes only in the top face, so the interior stays dark. This eliminates algae issues inside the channel and dramatically slows evaporation. The enclosed design also means the nutrient film (if you’re running NFT) stays protected and the humidity around roots stays high.
The downside of downspouts: you can’t see inside. If you get root clogging or a blockage, you won’t know until plants start wilting. Running a slight channel slope (about 1/4 inch drop per foot) and not overcrowding your planting holes will prevent most of those problems.
What Size Downspout to Use
For most home growers running leafy greens, herbs, and strawberries: 2x3 inch downspout is the right call. Standard 2-inch net cups drop in perfectly once you cut a slightly rounded hole with a hole saw or step drill. Spacing holes 6 inches apart gives you room for heads of lettuce without crowding.
For tomatoes, peppers, or anything that wants a bigger root zone: step up to 3x4 inch downspout. This gives your roots more lateral space and lets you use 3-inch net cups for better support. You won’t find as many stacked rack builds using 3x4 because it adds weight, but for a ground-level run of 4–6 feet it’s the better choice for fruiting plants.
Standard downspout sections come in 10-foot lengths. That’s your maximum channel length per run. In practice, 4–6 feet per channel is easier to manage and still gives you 8–10 plant sites per channel at 6-inch spacing.
How to Build a Recirculating NFT Downspout System
This is the most common build and the one that works best for leafy greens and herbs. You’re running a NFT hydroponic system where a thin stream of nutrient solution flows from one end of the channel to the other and drains back into a reservoir.
What you need:
- 10-foot 2x3 vinyl downspout (cut to your desired length)
- End caps for both ends (flat vinyl end caps, match your downspout size)
- 2-inch hole saw or step drill bit
- Net cups (2-inch diameter)
- Growing media: clay pebbles or your preferred growing media
- A reservoir (5-gallon bucket or larger tote)
- A small submersible pump (50–100 GPH is enough for a single channel)
- Vinyl tubing (1/2-inch ID)
- A drain fitting for the outlet end
Build steps:
- Cut your downspout to length. 4–6 feet is manageable for a first build.
- Mark hole locations on the top face every 6 inches, starting 3 inches from the inlet end.
- Drill 1.75-inch holes (for 2-inch net cups) using a hole saw. The cup flange should rest on the surface, so test the fit before drilling all holes.
- Attach one end cap to the outlet end. Drill a 1/2-inch drain hole near the bottom of that end cap to let nutrient solution drain back to the reservoir. Seal around the fitting with silicone.
- On the inlet end, leave the cap loose or drill an inlet hole in the top of the cap. Run your tubing in here and let it drip onto a small splash plate inside the channel so the flow distributes evenly rather than just running down one edge.
- Mount the channel at a slight downward slope toward the outlet end, about 1/4 inch drop per foot.
- Fill net cups with clay pebbles or your preferred growing media and seat transplants or rooted cuttings.
- Fill your reservoir with nutrient solution, set the pump to run, and check that solution flows evenly and drains back clean.
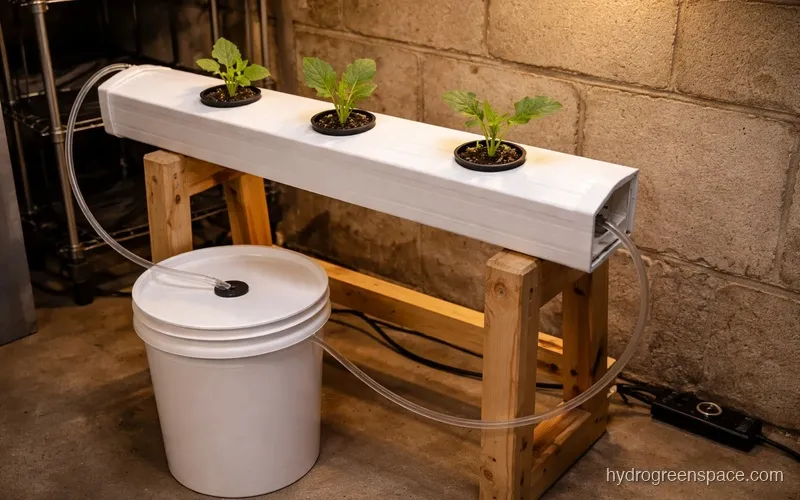
Common mistake: Sealing both end caps before testing slope and flow. Always do a water test first. Leaks around the drain fitting are common if the silicone hasn’t cured fully, so give it 24 hours before running nutrient solution.
Building a Passive Downspout Kratky System
Not every build needs a pump. If you want to grow lettuce or herbs with minimal equipment, a static downspout Kratky method setup works surprisingly well. This is especially good for a patio grow or somewhere you don’t want to run electrical.
The setup is nearly identical to NFT, except you seal both end caps completely and fill the channel with nutrient solution until it sits about 1/4 inch below the net cup holes. Roots grow down into the solution while the air gap above maintains oxygen at the root crown. No pump, no timer, just top off the solution every 1–2 weeks as plants consume it.
The tradeoff with a static downspout is that you can’t see the solution level without removing a net cup to check. Marking the outside of the channel at the correct fill level and using a small ruler through an open net cup hole solves this easily.
For Kratky in a downspout, stick to lettuce, spinach, herbs, and similar fast-finishing crops. The limited root volume in a sealed 2x3 channel isn’t ideal for long-season plants. Tomatoes belong in a DWC bucket or a full recirculating system.
Stacked Rack Builds for More Plant Sites
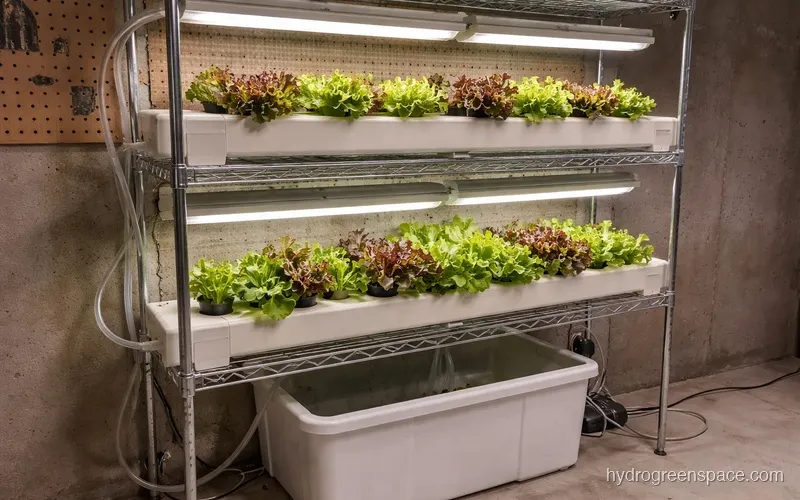
A single downspout gives you 8–10 plant sites. A stacked rack doubles or triples that in the same floor footprint. The rectangular profile of downspout sections makes stacking straightforward because they sit flat rather than rolling like round pipes.
A simple two-tier rack using 2x4 lumber or metal shelving gives you two channels per tier. Four channels total in a 4x4 foot footprint, yielding 32–40 plant sites, is a realistic home setup. The key with stacked builds is making sure the upper channels’ drain lines clear the lower channels cleanly, and that your reservoir is large enough to hold the combined solution volume for all channels.
For a four-channel stacked system, a 20-gallon reservoir with a single pump feeding each channel from a manifold is cleaner than running four separate pumps. Split the feed line with barb fittings and ball valves so you can adjust flow to each channel independently.
Food Safety and PVC: What You Actually Need to Know
This comes up on every forum thread about plastic hydroponics. Standard vinyl downspout is intended for rainwater drainage, not food contact. In practice, most downspout hydroponics growers use it without issues, but if you want to build to a food-safe standard, look for downspout or PVC pipe labeled NSF-61 or food-grade HDPE pipe of similar dimensions.
The risk from standard vinyl is lower than it sounds. The material is inert once cured, and at indoor temperatures it doesn’t leach significant compounds into a neutral pH nutrient solution. But if you’re growing for yourself and you want zero doubt, spend the extra few dollars on food-safe material. It’s not always easy to find in standard downspout profiles, so some growers substitute 3-inch square PVC drainage pipe, which is available in food-safe grades and cuts identically.
What Grows Well in Downspout Channels
The channel depth and root volume limits what thrives here. The best performers:
- Lettuce (all varieties): fast finishing, shallow roots, ideal spacing at 6 inches
- Herbs (basil, cilantro, parsley, chives): light feeders that do well in the constant moisture
- Spinach and arugula: 4-inch spacing works, high yield per foot
- Strawberries: work well in 3x4 channels with 8-inch spacing; runners need management
- Kale and chard: possible in 3x4, but roots get crowded; better suited to a larger system
Avoid determinate or indeterminate tomatoes and anything with a deep taproot. The enclosed channel just doesn’t give them the root volume they need to produce well. If tomatoes are your goal, look at a vertical PVC tower or a 5-gallon bucket system instead.
Keeping Channels Clear
Algae inside the channel isn’t the problem it is with open gutters, but root clogging is. Dense root mats from mature lettuce heads can block flow in a recirculating system if you let crops go too long before harvesting. Harvesting on schedule and running a channel flush with plain pH’d water between crop cycles keeps things clear.
If you’re using rockwool cubes as your starter media, make sure they’re wrapped or tucked into the net cup so loose fibers don’t break off and collect inside the channel. Clay pebbles are more forgiving in enclosed channels for this reason.
Once you get a system running and your timing dialed in, a downspout setup becomes one of the lower-maintenance hydroponic builds you can run. A downspout channel fits naturally into the DIY hydroponic systems toolkit alongside every other channel-based approach. The next move from here is scaling up: add more channels to a rack, add a second reservoir zone, or move your most productive crops into a dedicated NFT system with purpose-built channels.