
Hydroponics for Beginners: Systems, Costs & First Harvest
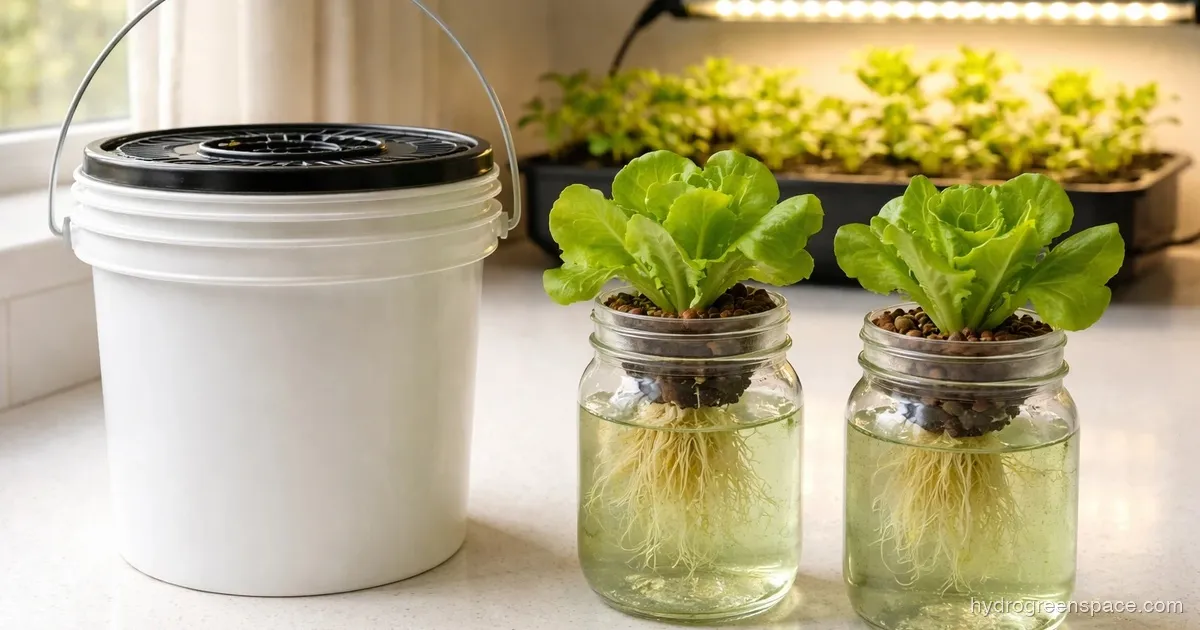
Hydroponics has a reputation for being complicated. That reputation is mostly wrong, but it’s earned enough truth to scare off plenty of people who would have done fine. The real problem isn’t the growing itself. It’s that most people start by reading everything they can find and end up less sure than when they started. This guide narrows things down, gives you real numbers, and points you at the right first move for your specific situation.
This guide covers every major piece of the puzzle a new grower needs to understand, from picking your first system to harvesting your first plant. Each section links out to a deeper post if you want to go further. Read it top to bottom if you’re starting from scratch, or jump to the section that’s blocking you right now.
You don’t need a grow tent, a grow light rack, or a $400 kit to get started. A jar, some water, a small bottle of liquid nutrients, and the right seed will do it.
Indoor Hydroponic Garden for Beginners: Start Here
The single biggest mistake new growers make is trying to understand every system before committing to one. DWC, NFT, ebb-and-flow, aeroponics, Kratky: reading about all of them in parallel is a reliable way to confuse yourself into inaction. You don’t need to know all of them. You need to know one, well enough to grow your first plant.
The foundational decisions for a beginner hydroponic setup are simpler than they look: pick a system that matches your budget and schedule, learn to check pH (which takes about two minutes per week once you have the right tool), and start with a forgiving plant. Lettuce is the standard recommendation for a reason. It grows fast, it tells you quickly if something’s off, and it’s genuinely useful in your kitchen.
If you’re asking what equipment you need to start hydroponics, the short answer is: a container, a growing medium like hydroton or rockwool, net pots, a nutrient solution, and a way to check your pH and EC levels. Everything beyond that is optional at first.
For the full guide, see Indoor Hydroponic Garden for Beginners: Start Here
How Much Does It Cost to Start Hydroponics at Home
Real numbers matter here, because many articles either lowball the cost or quietly assume you’re buying a premium kit. A Kratky jar setup for one or two plants will cost you $10 to $30 in one-time materials. A DWC bucket setup with a light runs $80 to $150. A proper tent build with environmental controls can reach $400 or more.
The important distinction is one-time costs versus ongoing costs. Nutrients and pH adjustment solution are what you’ll keep buying, and for a small system those monthly costs are genuinely low. The nutrient solution itself is not expensive when you’re mixing it yourself rather than buying premade bottles.
For the full guide, see How Much Does It Cost to Start Hydroponics at Home
Are Indoor Hydroponic Gardens Worth It? Honest Answer
The honest answer is: it depends on what you’re growing and what you’re comparing it to. Kratky lettuce pays for itself in a few months if you actually eat salad every week. A full tent build running expensive lights takes longer to pencil out, and if you’re growing crops you could buy for $2 at the grocery store, the math doesn’t add up.
Where hydroponics genuinely wins: speed, space efficiency, and the ability to grow fresh food year-round regardless of what’s happening outside. Where it doesn’t win: upfront cost, the learning curve in the first month, and the fact that some crops are just easier and cheaper to grow in soil outdoors. If you’ve asked yourself whether the whole thing is worth the trouble, the detailed breakdown in this post will give you an actual answer rather than cheerful optimism.
For the full guide, see Are Indoor Hydroponic Gardens Worth It? Honest Answer
Does Hydroponics Need Running Water? Not Always
One of the most persistent misconceptions about hydroponics is that it requires a plumbed water connection. It doesn’t. Your plants live in a closed reservoir that you fill by hand from any water source. You refill it every week or two depending on the system size and plant uptake. That’s it.
Whether you need a pump at all depends on the system. Kratky, the most beginner-friendly method, has no pump, no timer, and no moving parts. The reservoir sits still and the plant draws down the water as it grows. DWC uses an air pump and air stone to oxygenate the reservoir, but even that is a simple, inexpensive setup. Continuous circulation systems like NFT or ebb-and-flow need a water pump on a timer, but beginners rarely need to start there. Can you use tap water for hydroponics? Yes, in most cases, though you’ll want to test it first. High chlorine is easy to deal with (let it sit out overnight or use a small amount of dechlorinator). High mineral content is a bigger variable and worth knowing before you dial in your nutrient solution.
For the full guide, see Does Hydroponics Need Running Water? Not Always
EBT Eligible Hydroponic Systems: What SNAP Covers
This topic doesn’t get covered often, but it matters. SNAP/EBT benefits can be used to purchase seeds and food-producing plants, which opens up a real path to a functioning hydroponic setup even on a very tight budget. What EBT does not cover: hardware, nutrients, growing media, or any kind of system kit. The strategy for making this work is structuring your build so that seeds are your only recurring cost, with the rest of the setup paid for upfront in a different way.
If you’re working with a constrained budget, this post lays out exactly what qualifies under SNAP rules and how to plan around it.
For the full guide, see EBT Eligible Hydroponic Systems: What SNAP Covers
How to Build a Cheap Hydroponic System (3 Tiers)
You can build a working hydroponic system for less than a bag of potting soil. The Kratky jar setup (a mason jar or similar container, a net pot lid, some hydroton, a small bottle of liquid nutrients, and a seed) costs under $15 and requires no electricity at all. It’s not a toy. It grows real food.
From there, a DWC bucket with a small air pump and a basic grow light brings you to around $50 and opens up faster growth and slightly larger plants. A multi-bucket or storage tote build can handle four or more plants for under $100. The post below walks through all three tiers with actual parts lists and honest notes on where people go wrong. The most common budget build mistake, by the way, is skipping a pH meter and trying to eyeball it. That’s where cheap builds fail, not in the containers or the nutrients.
For the full guide, see How to Build a Cheap Hydroponic System (3 Tiers)
First 30 Days of Hydroponics: What to Expect
The first week of a hydroponic grow is mostly an exercise in restraint. Seeds germinate, roots appear, and almost nothing looks like it’s happening above the waterline. The instinct is to adjust something. The right move is usually to leave it alone. Most beginner problems in the first two weeks are caused by tinkering, not by the system.
By days 14 to 20, growth becomes visible and the system starts to feel real. By day 30, if you started with lettuce or basil, you’re typically looking at a plant that’s close to or ready for first harvest. This post gives you a day-by-day map of what normal looks like so you stop second-guessing whether something has gone wrong.
For the full guide, see First 30 Days of Hydroponics: What to Expect
12 Common Beginner Mistakes in Hydroponics to Avoid
Most people who quit hydroponics in the first month didn’t fail because the system is hard. They failed because nobody told them that pH drift kills plants quietly, that overfeeding looks like underfeeding, or that a reservoir temperature above 72°F creates root rot conditions fast. These aren’t obscure advanced problems. They’re the ones that hit beginners almost every time.
The most common early mistake is ignoring pH until something visibly goes wrong. By then, the plant has been in nutrient lockout for days and recovery is slow. The pH of your hydroponic water should sit between 5.5 and 6.5 for most crops, with 5.8 to 6.2 being the sweet spot for leafy greens. That number drifts over time and needs checking two or three times a week, which takes under two minutes once you have a digital pH meter. The other mistakes in this post range from tap water mineral content to light leaking into the reservoir (which causes algae) to choosing a complex system before you’ve successfully grown anything simpler.
For the full guide, see 12 Common Beginner Mistakes in Hydroponics to Avoid
Hydroponic Equipment Checklist: What You Actually Need
Every hydroponic system needs the same core set of things regardless of how you’re growing: a container to hold the nutrient solution, a way to support the plant over that solution (net pots and a growing medium like hydroton), the nutrient solution itself, and a way to measure pH and EC. Beyond that, what you add depends entirely on the system.
DWC adds an air pump and air stone. Any indoor setup without a window adds a grow light. Active recirculating systems add a water pump and timer. The checklist post organizes all of this by priority, so you know what to buy first, what can wait, and what is genuinely optional versus what will quietly cause problems if you skip it. If you’re heading to the store or opening up a browser tab to order parts, read this first.
For the full guide, see Hydroponic Equipment Checklist: What You Actually Need
First Hydroponic Harvest: When and How to Cut
Knowing when to harvest is less obvious than it sounds. Lettuce doesn’t look obviously “done” the way a tomato does. Basil starts to bolt if you wait too long. Mint can be harvested almost continuously once it’s established. The timing and method are different for each crop, and getting it wrong in either direction has real consequences.
The cut-and-come-again method works well for lettuce and basil: take the outer leaves or cut the plant back above the growth node, and the plant continues producing. For a first harvest, this extends your system’s output considerably instead of treating the first cut as the end of the grow. This post covers when each crop is actually ready, what to do with your reservoir the minute after you cut, and how to set up your next grow cycle without losing momentum.
For the full guide, see First Hydroponic Harvest: When and How to Cut
How to Choose Your First Hydroponic System for Beginners
The question “what’s the best hydroponic system for beginners?” has a real answer, not a fence-sitting one. If you have under $50 and want to start this week, the Kratky method is the right choice. If you have $50 to $150 and want faster growth and more plants, a DWC bucket is the step up. If space is your main constraint, a Kratky jar in a windowsill or under a single grow bulb is legitimately viable.
What you’re growing matters too. Leafy greens and herbs work in both Kratky and DWC without much fuss. Fruiting plants like tomatoes or peppers need more root space, more light, and more management. Starting with those in your first system is one of the more reliable ways to get discouraged. The post linked below walks through every major decision point by profile, so you can read your situation and land on a specific answer rather than a list of options. For a comprehensive look at how all the systems compare across budget, space, and crop type, this is the place to start.
For the full guide, see How to Choose Your First Hydroponic System for Beginners
Hydroponics for beginners doesn’t have to mean mastering everything at once. Pick one system, grow one crop, and learn what your specific setup needs. The principles transfer. Once you’ve grown a tray of lettuce in a Kratky jar, moved to a DWC bucket, or watched your first basil plant thrive without a drop of soil, the whole field opens up in a way that reading never quite delivers. Start simple, start small, and let the first harvest convince you.
Your next move: decide whether you’re starting with Kratky or DWC, then run through the hydroponic equipment checklist before you buy anything.