
Root Rot in Hydroponics: Causes, Treatment & Prevention
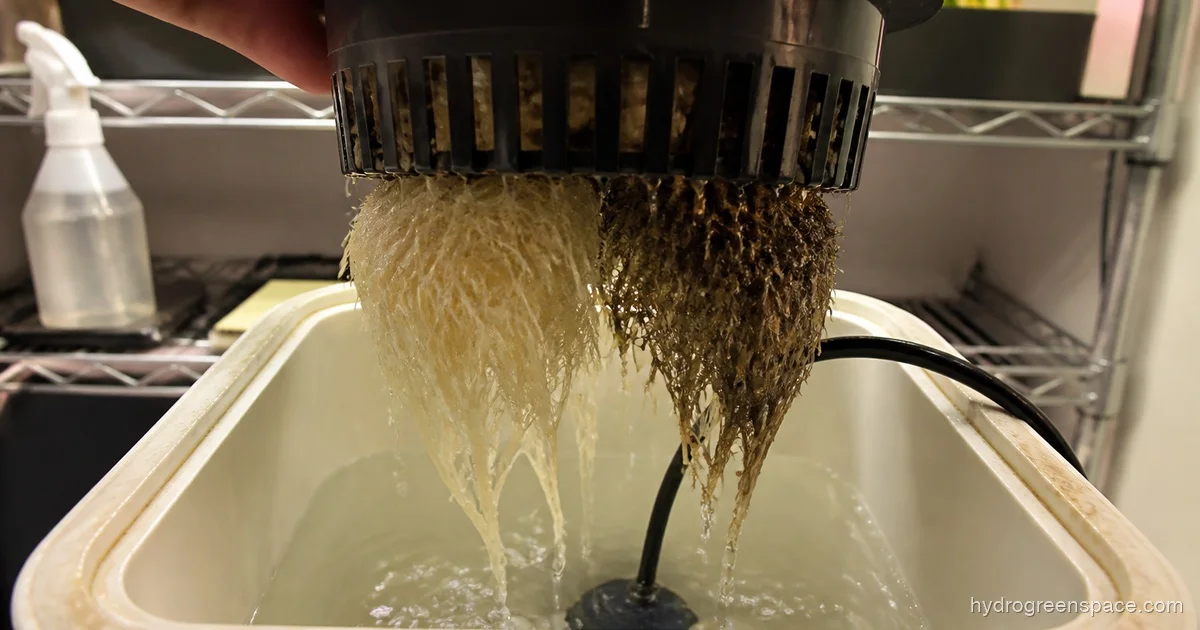
Pull up your net pot and look at the roots. If they’re white and slightly fuzzy, you’re in good shape. If they’re brown, slimy, and smell like a swamp, that’s root rot, and you need to move fast. Root rot in hydroponics moves quicker than it does in soil, because there’s no medium to slow it down. The pathogen has a direct path through warm, oxygen-depleted water to every root in your reservoir.
The good news: if you catch it early, most plants can be saved. The mistake most growers make is waiting until the leaves tell the story, at which point the roots are already mostly gone. This guide starts where it should, at the roots themselves.
What Healthy Roots Look Like vs. Root Rot (and What’s Just Staining)
Healthy hydroponic roots are white to cream-colored with a slightly fuzzy texture. That fuzz is root hair, and it’s exactly what you want. It means the root zone is actively growing and absorbing nutrients.
Root rot looks different in two stages. Early-stage rot shows as tan or light brown tips, soft to the touch, sometimes with a faintly sour smell. You might only notice a few roots affected while the majority still look clean. Late-stage rot is unmistakable: the roots turn dark brown or black, develop a slimy coating, and smell strongly of decay. At this point the root mass is collapsing, and your plant is struggling hard above the waterline.
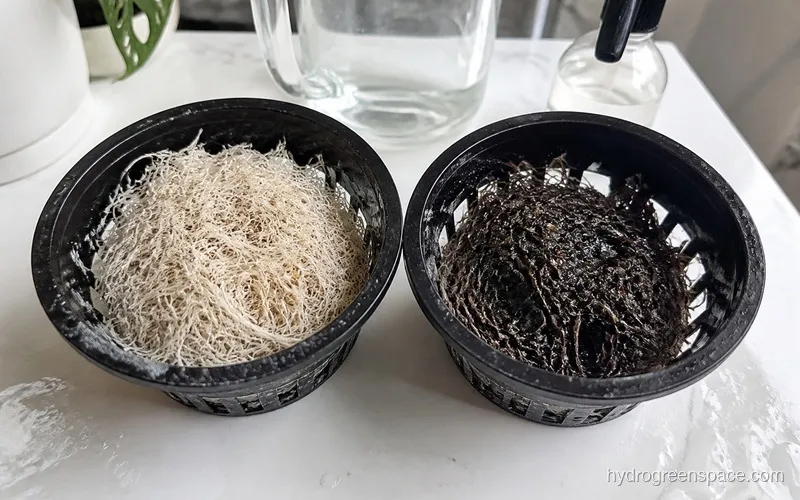
Here’s where growers get confused: not all brown roots mean rot. If you’ve been running nutrients with high iron or using certain organic additives, your roots can stain tan or light brown without any pathogen involved. The same thing happens with tannins from certain types of clay pebbles or any wood-based medium. Stained roots are firm and don’t smell. Rotted roots are soft, slimy, and have that distinctive odor. If you’re unsure, pinch a root gently. If it holds together, it’s probably staining. If it disintegrates or feels like wet tissue, that’s rot.
Tip: Smell your reservoir every time you do a water change. Healthy nutrient solution has a faint mineral smell. A swampy or sulfurous odor is your first warning sign, often before the roots even show visible damage.
What Actually Causes Root Rot in Hydroponics
Root rot in hydroponics is almost always caused by a water mold called Pythium, though Fusarium and a few other pathogens can cause similar damage. Pythium isn’t a true fungus, it’s an oomycete that thrives in exactly the conditions most hydroponic systems accidentally create: warm, low-oxygen water with a consistent nutrient supply.
Three factors drive almost every case of root rot:
Warm water temperature. Pythium reproduces aggressively above 72°F (22°C). The sweet spot for most hydroponic crops is 65–68°F (18–20°C). At 75°F and above, you’re essentially incubating the pathogen. This is the single most common cause of root rot in home DWC systems, especially during summer. If your reservoir is sitting in a warm room with no temperature control, you’re fighting an uphill battle. Learn more about keeping reservoir temps in range
Low dissolved oxygen. Pythium is an anaerobic organism. It thrives when oxygen in the root zone drops. Healthy roots need oxygen constantly; they’re not drawing it from the air the way leaves do, they’re pulling it from the water itself. Undersized air pumps, clogged air stones, and systems with no active aeration (like underpowered NFT setups) create the low-oxygen conditions Pythium needs to establish. See how to build and size an air stone setup
Light leaks into the reservoir. Algae and light exposure warm the water and consume dissolved oxygen. Even small light leaks around net pot holes or reservoir lids contribute to the problem. If you’ve seen algae growing in your reservoir, fix that at the same time you treat for root rot, because the two problems share the same root cause.
Different systems have different exposure levels. DWC and Kratky are particularly vulnerable because the roots are submerged continuously. NFT is somewhat more forgiving since the roots get air exposure between nutrient film passes, but a pump failure in NFT will cause root death and rot within hours. Compare how each system handles root zone oxygen
How to Treat Root Rot in Hydroponics
Before you do anything, assess how bad it is. Pull each plant and look at the roots. If more than 70–80% of the root mass is brown and slimy, the plant is unlikely to recover, and a restart is usually faster than a rescue attempt. If less than half the roots are affected and the plant still looks relatively healthy above the waterline, you have a real shot at saving it.
Step 1: Trim the Dead Roots
Using clean scissors sterilized with isopropyl alcohol, cut away every root that is visibly brown, slimy, or dead. Leave only the white and healthy tissue. Yes, this is aggressive. But dead root material is food for Pythium, and leaving it in the system will re-infect whatever healthy tissue remains.
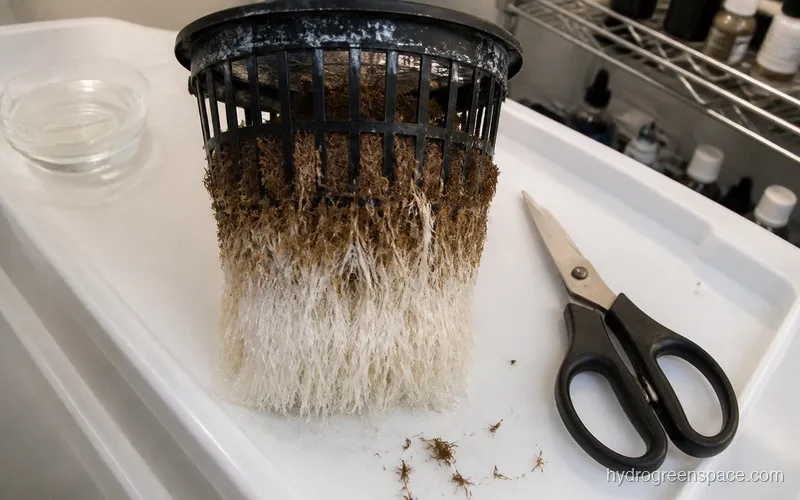
After trimming, rinse the remaining roots gently under room-temperature water.
Step 2: Clean the Reservoir
Empty the reservoir completely. Scrub it with a diluted bleach solution (1 tablespoon per gallon of water), then rinse thoroughly. Don’t skip this. Pythium zoospores survive in standing water and on every surface of your system. A clean reservoir with treated roots will re-infect within days if you put it back in a contaminated container.
Step 3: Choose Your Treatment Route
This is where you have a real decision to make. Both options work, but they have different tradeoffs.
Option A: Hydrogen Peroxide (H2O2)
Food-grade 3% hydrogen peroxide at roughly 3ml per gallon of nutrient solution will kill Pythium on contact. It also temporarily boosts dissolved oxygen as it breaks down. This is the faster-acting option and it works.
The tradeoff: H2O2 is indiscriminate. It will kill beneficial microbes along with the pathogen. It also degrades quickly in nutrient solution (it’s mostly gone within 24–48 hours), so it’s a treatment, not ongoing protection. You’ll need to do a full reservoir change after 24 hours with H2O2 to remove the byproducts before going back to your normal nutrient regime. Don’t use it with beneficial bacteria products since it will kill them too.
Warning: Don’t use H2O2 at concentrations above 3% without diluting. Stronger concentrations can burn healthy root tissue and damage your plants further. Stick to food-grade 3% at the recommended dose.
Option B: Beneficial Bacteria (Hydroguard / Bacillus)
Products like Hydroguard (Bacillus amyloliquefaciens) or similar Bacillus-based inoculants work by colonizing the root zone with bacteria that outcompete Pythium for space and nutrients. This is the slower approach, but it offers lasting protection rather than a one-time kill shot. How beneficial bacteria work in hydroponic systems
The tradeoff: beneficial bacteria take time to establish, usually 5–10 days before you see meaningful recovery. If the infection is severe, they may not be fast enough. They also require a healthy environment to thrive: correct pH, appropriate temperatures, and no chemical sterilants running alongside them. Don’t use H2O2 and beneficial bacteria in the same reservoir at the same time.
My recommendation: if the infection is early and moderate, go with beneficial bacteria and fix the environmental conditions driving the problem. If the infection is severe and you need to stop the bleeding fast, hit it with H2O2, do a full system flush after 24 hours, then reintroduce fresh nutrients and consider adding beneficial bacteria afterward for ongoing protection.
A third option worth knowing about: hypochlorous acid is gaining traction in hydroponic circles as a natural sanitizer that’s less harsh than H2O2 and doesn’t persist the way bleach does. It’s particularly useful for system sterilization between crops.
Step 4: Fix the Environment
Treatment without fixing the root cause will just get you root rot again in two weeks. The environmental checklist:
- Water temperature below 70°F ideally, 72°F maximum. If you’re over that, consider a DIY water chiller or move the reservoir to a cooler location.
- Aeration adequate for your reservoir volume. A general rule is at least 1 watt of air pump output per gallon of water. Add a second air stone if you’re running a single small stone in a large reservoir.
- Light exclusion complete. Cover every net pot hole, tape over any translucent reservoir walls, and check for gaps around lid fittings.
- pH stable between 5.5–6.5. Swings outside this range stress roots and make them more vulnerable. How to manage pH in your hydroponic system
When to Save the Plant vs. Starting Over
This is the question most growers avoid because they don’t want to lose the plant. But honesty here saves you more time in the long run.
Save the plant if:
- Less than 50% of roots are affected
- The plant still has green, turgid leaves (not wilting badly)
- You caught it early (no strong odor yet, or just beginning)
- The plant is in a critical growth stage (flowering, late veg) where restarting means losing weeks
Restart if:
- Most of the root mass is gone
- The plant is severely wilted and not recovering despite treatment
- The infection has spread to the crown or stem base
- You’re early in the grow and a new plant would catch up in 2–3 weeks anyway
If you’re seeing leaves curling down alongside brown roots, that’s a sign the root damage is already affecting the plant’s ability to take up water and nutrients. That combination pushes me toward a restart more often than not.
The harder lesson I learned: a struggling plant in a sick reservoir is a constant source of reinfection. Sometimes the kindest thing you can do for the rest of your garden is remove the plant, fully sterilize the system, and start clean. One bad plant that you nursed for three extra weeks is rarely worth the risk.
Preventing Root Rot for Good
Prevention is straightforward once you understand the conditions Pythium needs: warm water, low oxygen, no competition. Deny all three.
Keep your reservoir temperature consistently below 70°F. Run more aeration than you think you need. Block all light from reaching the water. Add a Bacillus-based beneficial bacteria product from day one of every grow, not just after you see a problem. And do regular water changes every 7–14 days rather than just topping off, because old nutrient solution accumulates organic matter that feeds pathogen populations.
If you’ve had root rot problems in rockwool starter cubes specifically, the culprit is often overwatering combined with poor airflow around the cubes. How to use rockwool correctly in hydroponics
These habits eliminate root rot in most home systems. The growers who deal with it repeatedly are usually fighting one of the big three: temperatures they haven’t addressed, aeration they’ve underestimated, or light leaks they haven’t traced. Fix those, and root rot becomes an occasional problem you catch early, not a recurring crop killer.
Once your roots are white and healthy again, the rest of your troubleshooting gets a lot simpler. Nutrient issues, yellowing leaves, or cloudy reservoir water are all much easier to diagnose when you know the root zone is clean. Start there.
Root rot is one of the more serious problems covered in the hydroponic troubleshooting guide, which runs through the full spectrum of common issues, from early warning signs to recovery, in a format built for home growers.