
Indoor Hydroponic Growing: The Complete Setup Guide
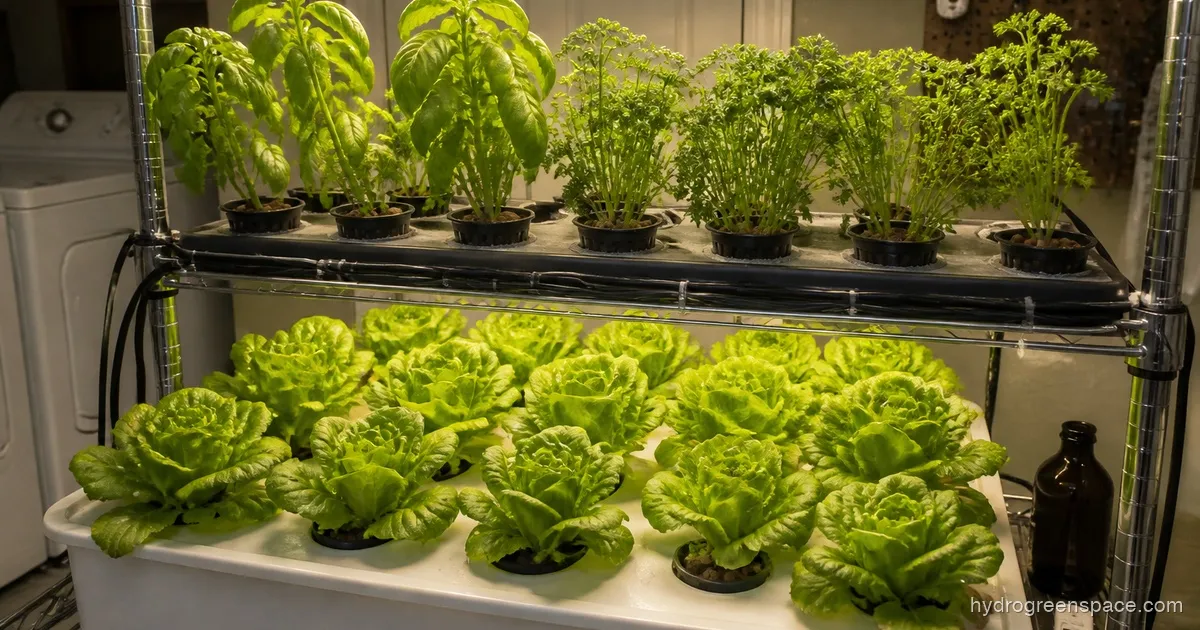
You don’t need a dedicated room, a big budget, or a green thumb to grow food indoors with hydroponics. A spare corner, a small closet, or even a kitchen countertop is enough to start harvesting fresh herbs and lettuce in a few weeks. The systems have gotten simpler, the lights have gotten cheaper, and the learning curve is genuinely manageable if you start with the right setup for your space.
What stops most people isn’t the growing itself. It’s the front-loaded decision paralysis: which system, which light, which nutrients, and whether any of this will survive in a one-bedroom apartment with a skeptical partner and inconsistent natural light. This guide is built to answer all of that, room by room, budget by budget, so you can make one good decision instead of fifteen uncertain ones.
Indoor hydroponic growing works by delivering nutrients directly to plant roots through water instead of soil, which means faster growth, no weeding, and the ability to grow year-round regardless of season or outdoor climate. The tradeoff is that you’re managing the environment yourself: light, temperature, humidity, and nutrient levels. That sounds like a lot, but for herbs and lettuce, it’s genuinely manageable with simple, inexpensive equipment.
This page covers every major aspect of setting up an indoor hydroponic garden, from choosing your space and system to lights, environment control, and which plants to start with. Each section links to a full guide that goes deep on that specific topic.
How to Build an Indoor Hydroponic Garden
The most common mistake beginners make is buying equipment before deciding on a system. A deep water culture (DWC) setup, a nutrient film technique (NFT) channel, and a kratky jar all need different containers, different pumps (or no pump at all), and different maintenance schedules. Pick your system first, then buy the components that fit it.
The good news: a basic DWC setup for herbs and lettuce costs $50 to $100 to build from scratch and produces a harvest within three to five weeks. You need a container, a net pot lid, an air pump, an air stone, nutrients, grow medium, and a light. That’s the whole list. The first week is mostly watching water levels and making sure roots establish.
If you’re asking yourself whether it’s worth doing at all for an apartment, the honest answer is yes, with the right expectations. You won’t replace your grocery store. You will have fresh basil and lettuce within arm’s reach and a better understanding of why hydroponic produce tastes different from store-bought.
For the full guide, see How to Build an Indoor Hydroponic Garden.
Indoor Hydroponic System With Lights
Window light is almost never enough for a productive indoor hydroponic garden. Most indoor spaces receive two to five hours of usable light on a good day, and glass filters out a significant portion of the spectrum plants actually need. If your plants are growing slowly, stretching toward the window, or looking washed out, the light is the problem.
For home setups, full-spectrum LED panels are the practical choice. They run cooler than HID lights, use less electricity, and have come down dramatically in price over the past few years. A decent panel for a 2x2 ft grow area costs $60 to $120 and will outperform any window for leafy greens and herbs. The light schedule for most crops is 16 hours on, 8 hours off.
A common question from apartment growers is whether indoor hydroponic gardens need any sunlight at all. They don’t. A good LED grow light provides everything the plant needs: the right spectrum, the right intensity, and a consistent photoperiod you control completely. Sunlight is a bonus, not a requirement.
For the full guide, see Indoor Hydroponic System With Lights.
Basement Hydroponics
A basement is one of the best spaces in a home for a hydroponic setup, and it’s consistently underused. The temperature is naturally stable, the space is already isolated from the rest of the house, and you don’t have to worry about disturbing anyone when the pump cycles at 2am. The main challenges are lighting (basements typically get zero natural light), humidity (basements tend to run damp), and ensuring adequate airflow.
The payoff is significant: a basement setup can run year-round without fighting summer heat or winter drafts, and you can scale it up considerably compared to a bedroom or closet grow. Leafy greens, herbs, and even fruiting crops like cherry tomatoes become realistic options with the right system and light coverage.
For the full guide, see Basement Hydroponics: The Complete Beginner’s Setup Guide.
Apartment Hydroponics
Growing food in an apartment is not a space problem. It’s a prioritization problem. A 2x2 ft footprint in a corner of a bedroom or kitchen can produce more fresh herbs and greens than most households actually use. The questions that actually matter for apartment growers are about smell, landlord approval, and light, not square footage.
Does it smell? A well-maintained hydroponic system growing herbs and lettuce has very little odor. The smell people associate with hydroponics typically comes from reservoirs that haven’t been cleaned, algae growth, or root rot. Maintain your system properly and keep the reservoir covered, and odor is not a real concern for small herb and greens setups.
The one legitimate apartment concern is electricity, since a grow light running 16 hours a day will add to your bill, though a single panel for a small setup typically adds $10 to $20 per month.
For the full guide, see Apartment Hydroponics: Systems, Costs & Landlord Tips.
Indoor Herb Garden Hydroponic System
An indoor herb garden is the best starting point for most beginners, and not just because herbs are easy. Basil, mint, cilantro, and parsley are the crops with the highest return on effort: small footprint, fast growth, frequent harvest, and real culinary value. A system the size of a coffee maker can replace what you’d normally spend on fresh herbs in a month.
The gap between “plug it in and wait” and “consistently harvest fresh herbs” is wider than most product listings suggest. Basil, in particular, will bolt quickly under the wrong light schedule or struggle with nutrient concentration. Getting the first two weeks right, specifically light duration and nutrient dilution for seedlings, is where most beginners run into trouble.
All-in-one systems like AeroGarden work well for this use case and are genuinely beginner-friendly. DIY DWC setups cost less and scale better, but require more attention in the first cycle. Either path works. The right choice depends on how much time you want to spend on setup versus maintenance.
For the full guide, see Indoor Herb Garden Hydroponic System.
Indoor Hydroponic Garden With Fish
Aquaponics, which combines fish and hydroponics in a single system, is one of the most self-sustaining forms of indoor growing available to home growers. Fish waste breaks down into nitrates through a biological cycling process, and those nitrates feed the plants. Done right, the fish feed the plants and the plants filter the water for the fish.
The critical difference between a real aquaponic system and dropping a goldfish into a Kratky jar is cycling. The nitrogen cycle has to be established before fish go in, typically over three to four weeks, so beneficial bacteria have time to colonize. Skip this step and you’ll lose the fish to ammonia poisoning within days.
For small indoor setups, goldfish, guppies, and tilapia are the practical choices. Tilapia grow fast enough to be a food source. Goldfish and guppies are low-maintenance and work well in compact systems where you’re focused on plant production.
For the full guide, see Indoor Hydroponic Garden With Fish: Aquaponics Guide.
Best Seeds for an Indoor Hydroponic Garden
You don’t need special hydroponic seeds. Any packet from a garden center or seed supplier works in a hydroponic system. What matters is choosing varieties that match your light levels, your system type, and your available space. Compact, fast-maturing varieties outperform standard field varieties in most indoor setups.
Leafy greens are the right starting point for nearly every beginner. Butterhead lettuce, arugula, and spinach grow quickly, tolerate a wide nutrient range, and don’t require high light intensity. Herbs are the second tier: high value, compact, and well-suited to the nutrient levels and light schedules you’ll already be running for greens.
Fruiting plants (tomatoes, peppers, cucumbers) are possible indoors but require more light, more space, and more precise nutrient management than most beginners want to take on in their first system. Start with greens and herbs, run two or three cycles, then decide if you want to add complexity.
For the full guide, see Best Seeds for Indoor Hydroponic Gardens.
Garage Hydroponics
A garage is one of the most practical spaces for a serious hydroponic setup because of the floor space, the separation from living areas, and the tolerance for equipment noise and occasional water spills. The challenges are real but solvable: temperature swings (especially in climates with cold winters or hot summers), electrical capacity, and dust infiltration into reservoirs.
Temperature management is the main variable in a garage grow. Most hydroponic crops want air temperatures between 65°F and 80°F and water temperatures below 72°F. In a garage that hits 95°F in August or 35°F in January, you’ll need a portable AC unit, a heater, or insulation, depending on your climate. The cost of climate control is the biggest factor in a garage setup budget.
The upside: a garage setup can run a grow tent or multiple DWC buckets at a scale that a bedroom or closet simply can’t accommodate. For growers who want to produce a meaningful amount of food year-round, a garage is often the right long-term answer.
For the full guide, see Garage Hydroponics: How to Grow Year-Round.
Grow Tent Setup for Hydroponics
A grow tent gives you a contained, controlled environment inside any room in your home. The reflective interior walls bounce light back onto your plants, the built-in ports make ventilation and ducting straightforward, and the enclosed space is far easier to maintain at the right temperature and humidity than an open corner of a room.
The most important thing about setting up a grow tent is sequence. Fill the reservoir last. Hang the light and set up the ventilation before anything else is inside the tent, because there’s almost no working room once equipment and water are in place. Most first-time tent growers figure this out at 10pm on a Wednesday while crouching over a full reservoir with a grow light swinging loose above them.
For a hydroponic system, a 2x4 ft tent fits a standard DWC setup for 8 to 10 plants. A 4x4 ft tent works for larger NFT channels or multiple bucket systems. The tent itself isn’t expensive, typically $80 to $150, but you’ll need to budget for the light, ventilation fan, carbon filter (if odor matters), and ducting separately.
For the full guide, see Grow Tent Setup for Hydroponics: Step-by-Step Guide.
Bedroom Hydroponics
Running a hydroponic system in your bedroom is completely doable, but the usual grow-room advice, which amounts to “close the door and check it in the morning,” doesn’t apply when you’re sleeping six feet from your plants. The light schedule is the real issue: a 600-watt panel cycling on at 6am is incompatible with sleeping until 8am unless you set the timer to run lights at night.
Light-proof curtains, a timer set to run your lights during the day while you’re away, or an opaque tent with the light sealed inside are all workable solutions depending on your setup. Pump noise is a lesser concern: modern air pumps designed for aquariums run at 25 to 30 decibels, which is below the threshold most people notice in a quiet room.
Humidity deserves attention in a bedroom setup. A reservoir and wet grow medium will add moisture to the air. In most homes, a small dehumidifier running during lights-on hours is enough to keep relative humidity in the 50% to 65% range that’s comfortable for sleeping and healthy for plants.
For the full guide, see Bedroom Hydroponics: Grow Plants Without Losing Sleep.
Closet Hydroponics
A standard reach-in closet, roughly 6 ft wide by 2 ft deep, is one of the most efficient spaces for a small hydroponic setup. The walls are already close enough to double as a grow tent if you add a reflective mylar liner or simply paint them flat white. The door gives you natural light control. And the space is completely separate from the rest of your living area, which matters for humidity and pump noise.
The main question for most closet setups is whether to run a grow tent inside the closet or treat the closet itself as the grow space. A tent inside a closet adds a second layer of containment and makes cleanup easier, but it cuts into your usable footprint. For a 6-ft closet, a 3x2 ft tent works without feeling cramped. For anything smaller, treating the closet directly as the grow space is the practical choice.
Ventilation is non-negotiable in a closet. A 4-inch inline fan exhausting into the hallway or an adjacent room keeps temps in check and prevents humidity from building up to levels that encourage mold. If odor is a concern, add a carbon filter to the inline fan output.
For the full guide, see Closet Hydroponics: How to Set Up a Small Grow Space.
Balcony Hydroponics
A balcony gives you free natural light, fresh air, and outdoor temperatures, which sounds ideal until you realize that outdoor temperatures kill crops more often than they help them, and that a reservoir sitting in direct afternoon sun will hit 80°F and crash your roots within hours. Balcony hydroponics is genuinely viable, but it requires a bit more environmental thinking than an indoor setup.
The three checks before buying anything for a balcony setup: How much direct sun does the balcony actually get (not what you hope it gets)? What’s the temperature range from morning to peak afternoon? And is there weather protection, or will your system get rained on? A balcony with 4 to 6 hours of morning sun and afternoon shade is ideal. A south-facing balcony with full afternoon exposure needs shade cloth and a well-insulated reservoir.
Balconies work particularly well for herbs and fruiting crops in mild climates because you can supplement weak outdoor light with a grow light during cloudy periods or in the shoulder seasons without the space and equipment constraints of a fully indoor setup.
For the full guide, see Balcony Hydroponics: Setup, Systems & What to Grow.
The best time to start indoor hydroponic growing is before you feel ready. A $50 DWC jar and a single LED panel is enough to run your first lettuce or herb cycle, figure out what you actually want from the hobby, and decide whether you want to scale up or keep it simple. Most people who spend $400 building a complex first setup wished they had started small. Most people who start small end up building something bigger because it actually works.
Pick the space that makes the most sense for your home, whether that’s a kitchen corner, a spare closet, or a bedroom shelf, and start there. The cluster posts above cover every space in detail. Pick the one that matches your situation and read it through before you buy a single component.