
How to Grow Hydroponic Strawberries at Home
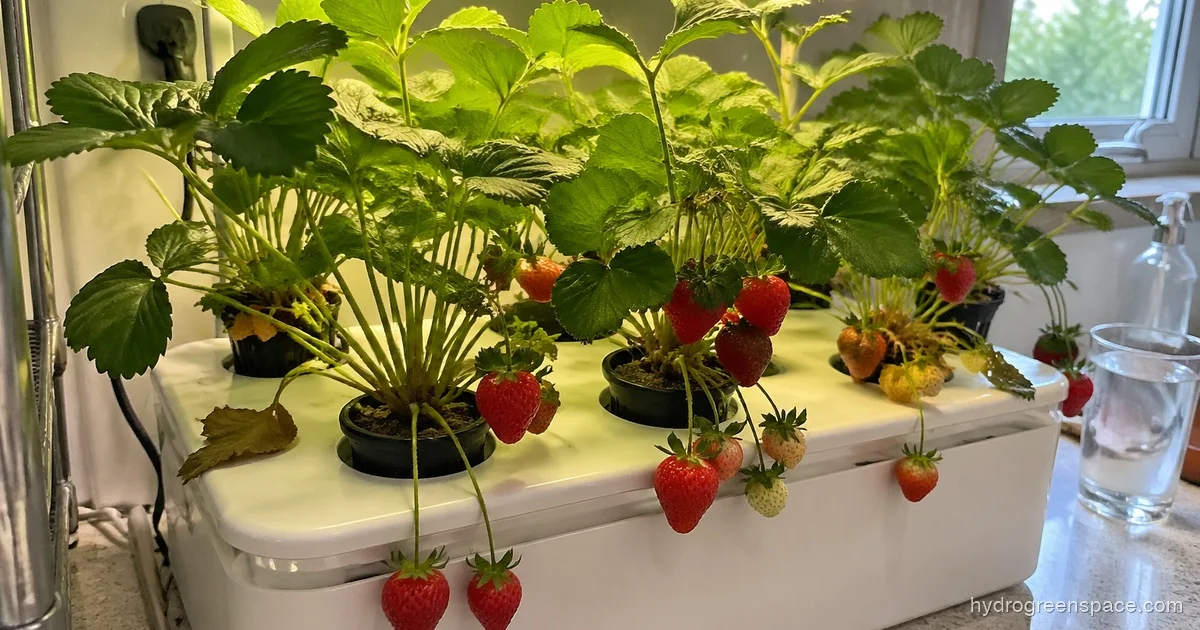
Strawberries are the crop that makes people believe hydroponics is actually worth it. They grow fast, fruit continuously, and taste like real strawberries from a garden (better, even, if you dial things in correctly). The catch is that most first-time growers pick the wrong variety, skip a few preparation steps, and then wonder why their plants are either not fruiting or producing sour, disappointing berries.
This guide covers how to grow hydroponic strawberries at home from bare-root plant to first harvest, including the decisions that actually affect flavor.
Pick the Right Variety First: This Matters More Than the System
Day-neutral strawberries are the correct answer for hydroponics, full stop. June-bearing varieties require a cold dormancy period and produce fruit in one short window per year. That is fine in a field but useless in a controlled indoor environment where you want consistent harvests year-round.
Day-neutral varieties produce fruit based on temperature rather than day length, which means they keep flowering and fruiting as long as conditions are right. The three varieties that consistently perform well indoors:
- Albion: firm berries, high sugar content, excellent disease resistance, and strong yield. My top recommendation for beginners.
- Seascape: slightly softer fruit, very productive, handles a wider pH range without complaining.
- Tristar: smaller berries but intensely flavored. Great for vertical systems where pot size is limited.
Everbearing varieties like Ozark Beauty sit between day-neutral and June-bearing. They will fruit twice a year indoors, but the production gaps make them less efficient for hydroponic growing. Stick with true day-neutral types. For a deeper look at which cultivars perform best in different systems, check best strawberry varieties for hydroponics.
Choosing a System: DWC or NFT for Home Growers
Both Deep Water Culture (DWC) and Nutrient Film Technique (NFT) work well for strawberries at home. The right choice depends on your setup and tolerance for fussiness.
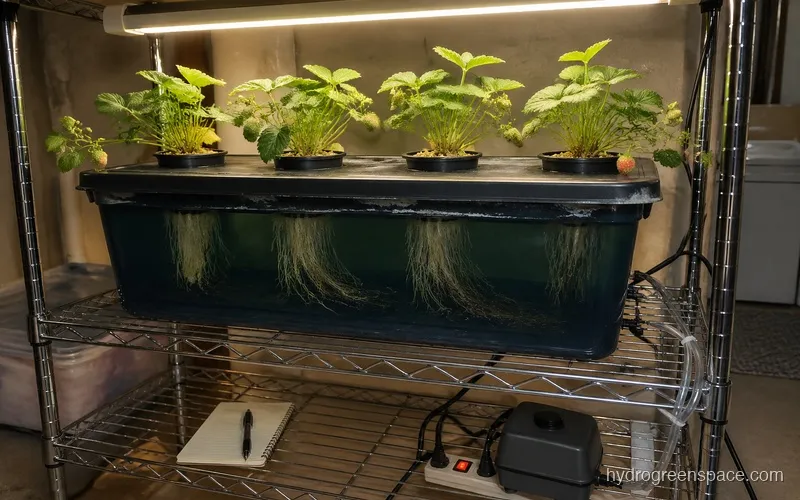
DWC suspends plants in net pots over a reservoir of oxygenated nutrient solution. It is forgiving for beginners because the water buffer gives you time to catch pH and EC problems before they affect the plant. You can build a DWC system at home with a few buckets, net pots, an air pump, and airline tubing for under $30.
NFT runs a thin film of nutrient solution along a sloped channel past the roots. It uses less water, is easier to scale, and allows for creative vertical configurations. The tradeoff is that NFT has almost no buffer. If the pump stops or pH goes wrong, plants stress within hours.
For most home growers, DWC is the better starting point. Once you have grown a crop or two and understand how strawberries behave in a hydroponic environment, NFT becomes worth exploring. If space is a limiting factor, a vertical PVC tower for strawberries can fit a surprising number of plants on a balcony or in a corner of a room.
If you are still working out which direction to go, choosing your first hydroponic system walks through the full comparison.
Preparing Bare-Root Plants Before Transplanting
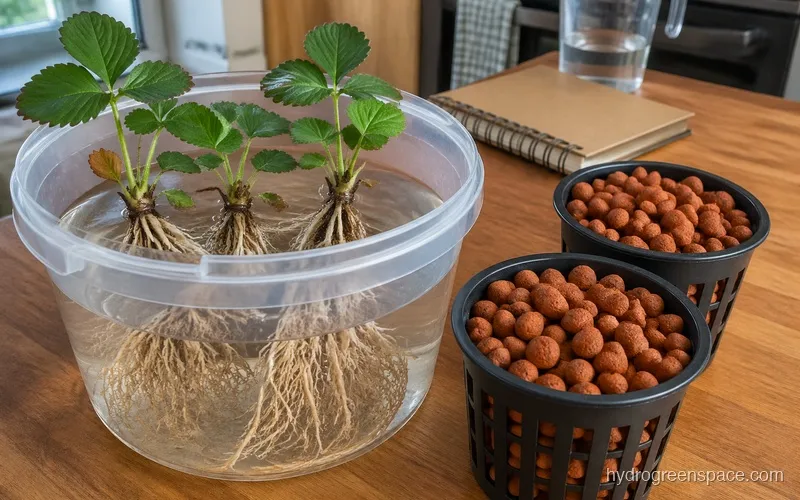
Bare-root strawberry plants are the most common and cost-effective starting point for hydroponics. You order them dormant, they arrive looking half-dead, and a quick rinse before planting is not enough.
Here is the prep process that actually works:
- Soak roots in plain pH-adjusted water (6.0) for 1–2 hours to rehydrate the plant after shipping. Add a few drops of liquid kelp if you have it, as it helps with transplant shock.
- Inspect and trim. Remove any dead, brown, or mushy roots with clean scissors. Healthy roots are white or light tan. Leave all the healthy root mass intact.
- Remove older leaves. Keep the central crown and the two or three newest leaves. Strip off anything yellowed or wilted. This lets the plant focus energy on establishing roots rather than maintaining old foliage.
- Check the crown. The crown is the thick base where roots meet leaves. It should be firm. A soft, mushy crown means the plant is already rotting and will not recover. Discard it.
After prep, nestle the plant into a net pot filled with clay pebbles in the net pots or rockwool so the crown sits just at the surface, not buried. A buried crown is one of the fastest ways to kill a strawberry plant in hydroponics.
pH, EC, and Nutrients
Strawberries are not as demanding as tomatoes or peppers, but they do have a narrower sweet spot for pH and nutrient concentration than lettuce or herbs.
| Parameter | Target Range |
|---|---|
| pH | 5.5 – 6.5 (ideal: 5.8 – 6.2) |
| EC during vegetative growth | 1.0 – 1.2 mS/cm |
| EC during flowering and fruiting | 1.2 – 1.4 mS/cm |
| Water temperature | 65 – 72°F (18 – 22°C) |
Keep pH toward the lower end of that range (5.8 – 6.0) for the best phosphorus and calcium uptake. Calcium deficiency is a common problem with strawberries. It shows up as tip burn on young leaves and blossom end rot on developing fruit. A calcium-magnesium supplement added to your base nutrient solution prevents most of these issues.
For how to feed hydroponic plants with a structured nutrient schedule, that guide covers mixing and dosing in detail.
Pollinating Strawberries Indoors
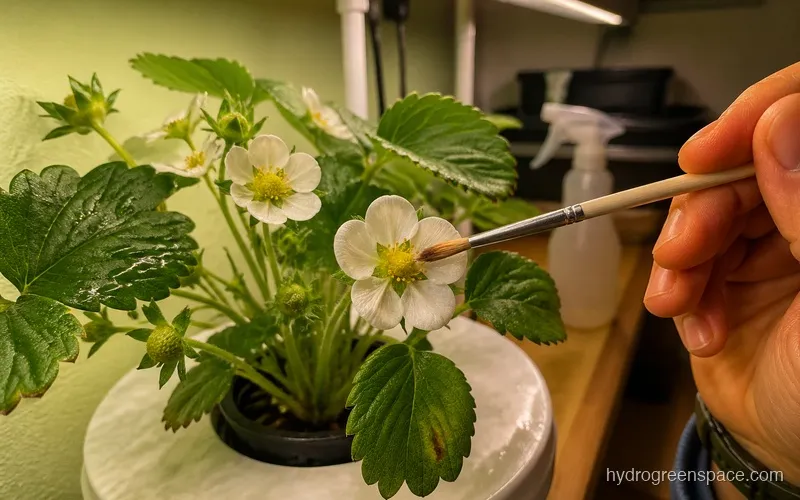
Outdoors, bees handle pollination without you thinking about it. Indoors, that job falls to you. Poor pollination is the main reason hydroponic strawberries produce small, misshapen, or partially developed fruit, and most growers do not realize this is the cause.
The fix is simple. Once flowers open, take a small soft paintbrush (or your fingertip) and gently swirl it around the center of each open flower to transfer pollen. Do this every day or every other day while flowers are open. It takes about two minutes once you get into the habit.
A small fan running at low speed also helps. Air movement mimics the vibration from bee wings and shakes pollen loose naturally. If you are running grow lights and a fan for temperature management, you have already partially solved the pollination problem.
For a full walkthrough of timing and technique, see how to pollinate strawberries indoors.
Managing Runners: Keep or Remove?
Strawberry plants produce runners (long horizontal stems that develop into new plants). In a hydroponic system, runners are a resource decision, and most growers do not think about them deliberately.
Remove runners during fruiting. Every runner the plant produces pulls energy away from fruit development. If your goal is maximum yield from your current plants, cut runners at the base as soon as they appear. Plants that are kept runner-free can produce 30–50% more fruit during their production window.
Keep runners to propagate. If you want to expand your system without buying new plants, allow a few runners to develop and root them into small rockwool cubes or net pots. Once the new plant has established roots (usually two to three weeks), cut it free from the mother plant.
Pro Tip
During the first 12 months, remove all runners. Let the plant fruit hard. In month 12–14, allow two or three runners per plant to root so you are replacing aging plants with vigorous young ones for free.
Why Are My Hydroponic Strawberries Sour?
Sour strawberries are a common frustration, and the cause is almost always one of three things:
Not enough light. Strawberries need 14–16 hours of light per day to develop proper sugar levels. If your grow light setup indoors is providing less than that, or if the light intensity is too low (under 200 µmol/m²/s), the plant will not produce enough photosynthate to sweeten the fruit. Full-spectrum LEDs at 18–24 inches above the canopy are the standard for home systems.
EC too low. A nutrient solution below 1.2 mS/cm during fruiting produces watery, low-sugar berries. Bump EC to 1.4 mS/cm as soon as you see flowers developing.
Night temperature too warm. Strawberries concentrate sugar at night when temperatures drop. A nighttime temperature of 50–55°F (10–13°C) triggers sugar accumulation and produces noticeably sweeter fruit. If your grow space stays at 70°F around the clock, your strawberries will taste flat by comparison. Even dropping the temperature to 60°F at night makes a meaningful difference.
For the full picture on nutrient ratios during fruiting, the guide on nutrient solution for strawberries goes deeper on potassium levels and their effect on flavor.
Timeline: What to Expect
One of the most common questions from new growers is how long this actually takes. Here is a realistic timeline from bare-root transplant:
- Week 1–2: Plant establishes. You may see some die-back of older leaves (this is normal). New white roots should be visible through the net pot.
- Week 3–4: First new leaves appear, plant starts growing actively.
- Week 4–6: First flowers open (day-neutral varieties move fast).
- Week 10–12: First harvest. Expect smaller berries initially as the plant matures.
- Month 3–6: Full production. A healthy Albion plant in DWC can produce 150–300g of fruit per month under good conditions.
- Month 12–18: Plants begin to decline. Replace with rooted runners from month 12 onward.
For a detailed breakdown of what affects that timeline, including light hours and root zone temperature, see how long hydroponic strawberries take to fruit.
Setting Up the Physical System
Before your bare-root plants arrive, have everything ready. A hydroponic equipment checklist is worth reviewing if you are setting up for the first time.
For a DWC home setup you will need: a dark reservoir (5-gallon bucket or larger tote), net pots (2-inch works well for strawberries), an air pump with airline and airstones, pH and EC meters, pH adjustment solution, and a strawberry-specific or general hydroponic base nutrient.
Fill the reservoir so the bottom of the net pots are just touching the nutrient solution during the first week. Once roots extend down into the reservoir, lower the water level slightly to leave an air gap, because roots need oxygen, not permanent submersion.
A Few Things Worth Knowing Before You Start
Hydroponic strawberries are not difficult, but they do respond quickly to neglect. Check pH and EC at least three times a week during fruiting, daily if you can manage it. Top off the reservoir with plain pH-adjusted water between nutrient changes to maintain concentration. Full reservoir changes every 7–10 days keeps the system clean and prevents salt buildup.
The common mistakes beginners make in hydroponic growing apply here too, especially around water temperature and reservoir hygiene. Keeping your root zone below 72°F prevents root rot, which is the most common reason hydroponic strawberry plants fail mid-season.
If you want to expand beyond strawberries once you have the system dialed in, other crops you can grow hydroponically covers what pairs well with the same EC and pH ranges.
Once your first harvest comes in, you will understand why so many growers never go back to store-bought. If you want a broader view of the full growing picture before diving in, the complete guide to hydroponic strawberries covers every stage from system selection to harvest in one place.